There are SO MANY different methods floating around about how to swatch your yarn, but the one I’m about to share with you is the best one I’ve learned yet. It can take a bit of extra time and scrap yarn (let’s be honest, who doesn’t have a ton of scrap yarn tangling around?), but if you keep your swatches (and you should!), you’ll save yourself some trouble in the long run, especially if you find yourself returning to the same yarns over time.
Why this method? Well, do you have Multiple Project Syndrome? I sure do! I often dive into a new project or swatching a yummy new yarn and then end up giving in to the lure of yet another squishy new yarn before I’ve completed using a previous one.
That’s where this method comes in handy–you don’t have to remember anything about the swatch other than what yarn it is! The tension number or knitting needle size, the stitch numbers, the row count? It’s all right there in the swatch itself when you do it this way. There’s no guessing. The eyelets you see in the picture below are a code that tells you what machine was used and what tension the swatch was knitted at! The contrasting scrap yarn marks the beginning and end rows, and the small loops around the stitches in the middle mark the same number of stitches between them every single time.
This method is consistent, and I’ve found it to be the most accurate way of calculating stitch and row gauge because it leaves extra fabric around the area to be measured, which makes for less distortion of the stitches. The contrasting color markers make it easy to immediately find your measuring start and end points.
And this method isn’t just for machine knitters! I use it when hand knitting, too. Instructions are for machine knitting, but a hand knitting summary will follow.
Note: This tutorial does not include how to calculate gauge, only how I swatch yarn.


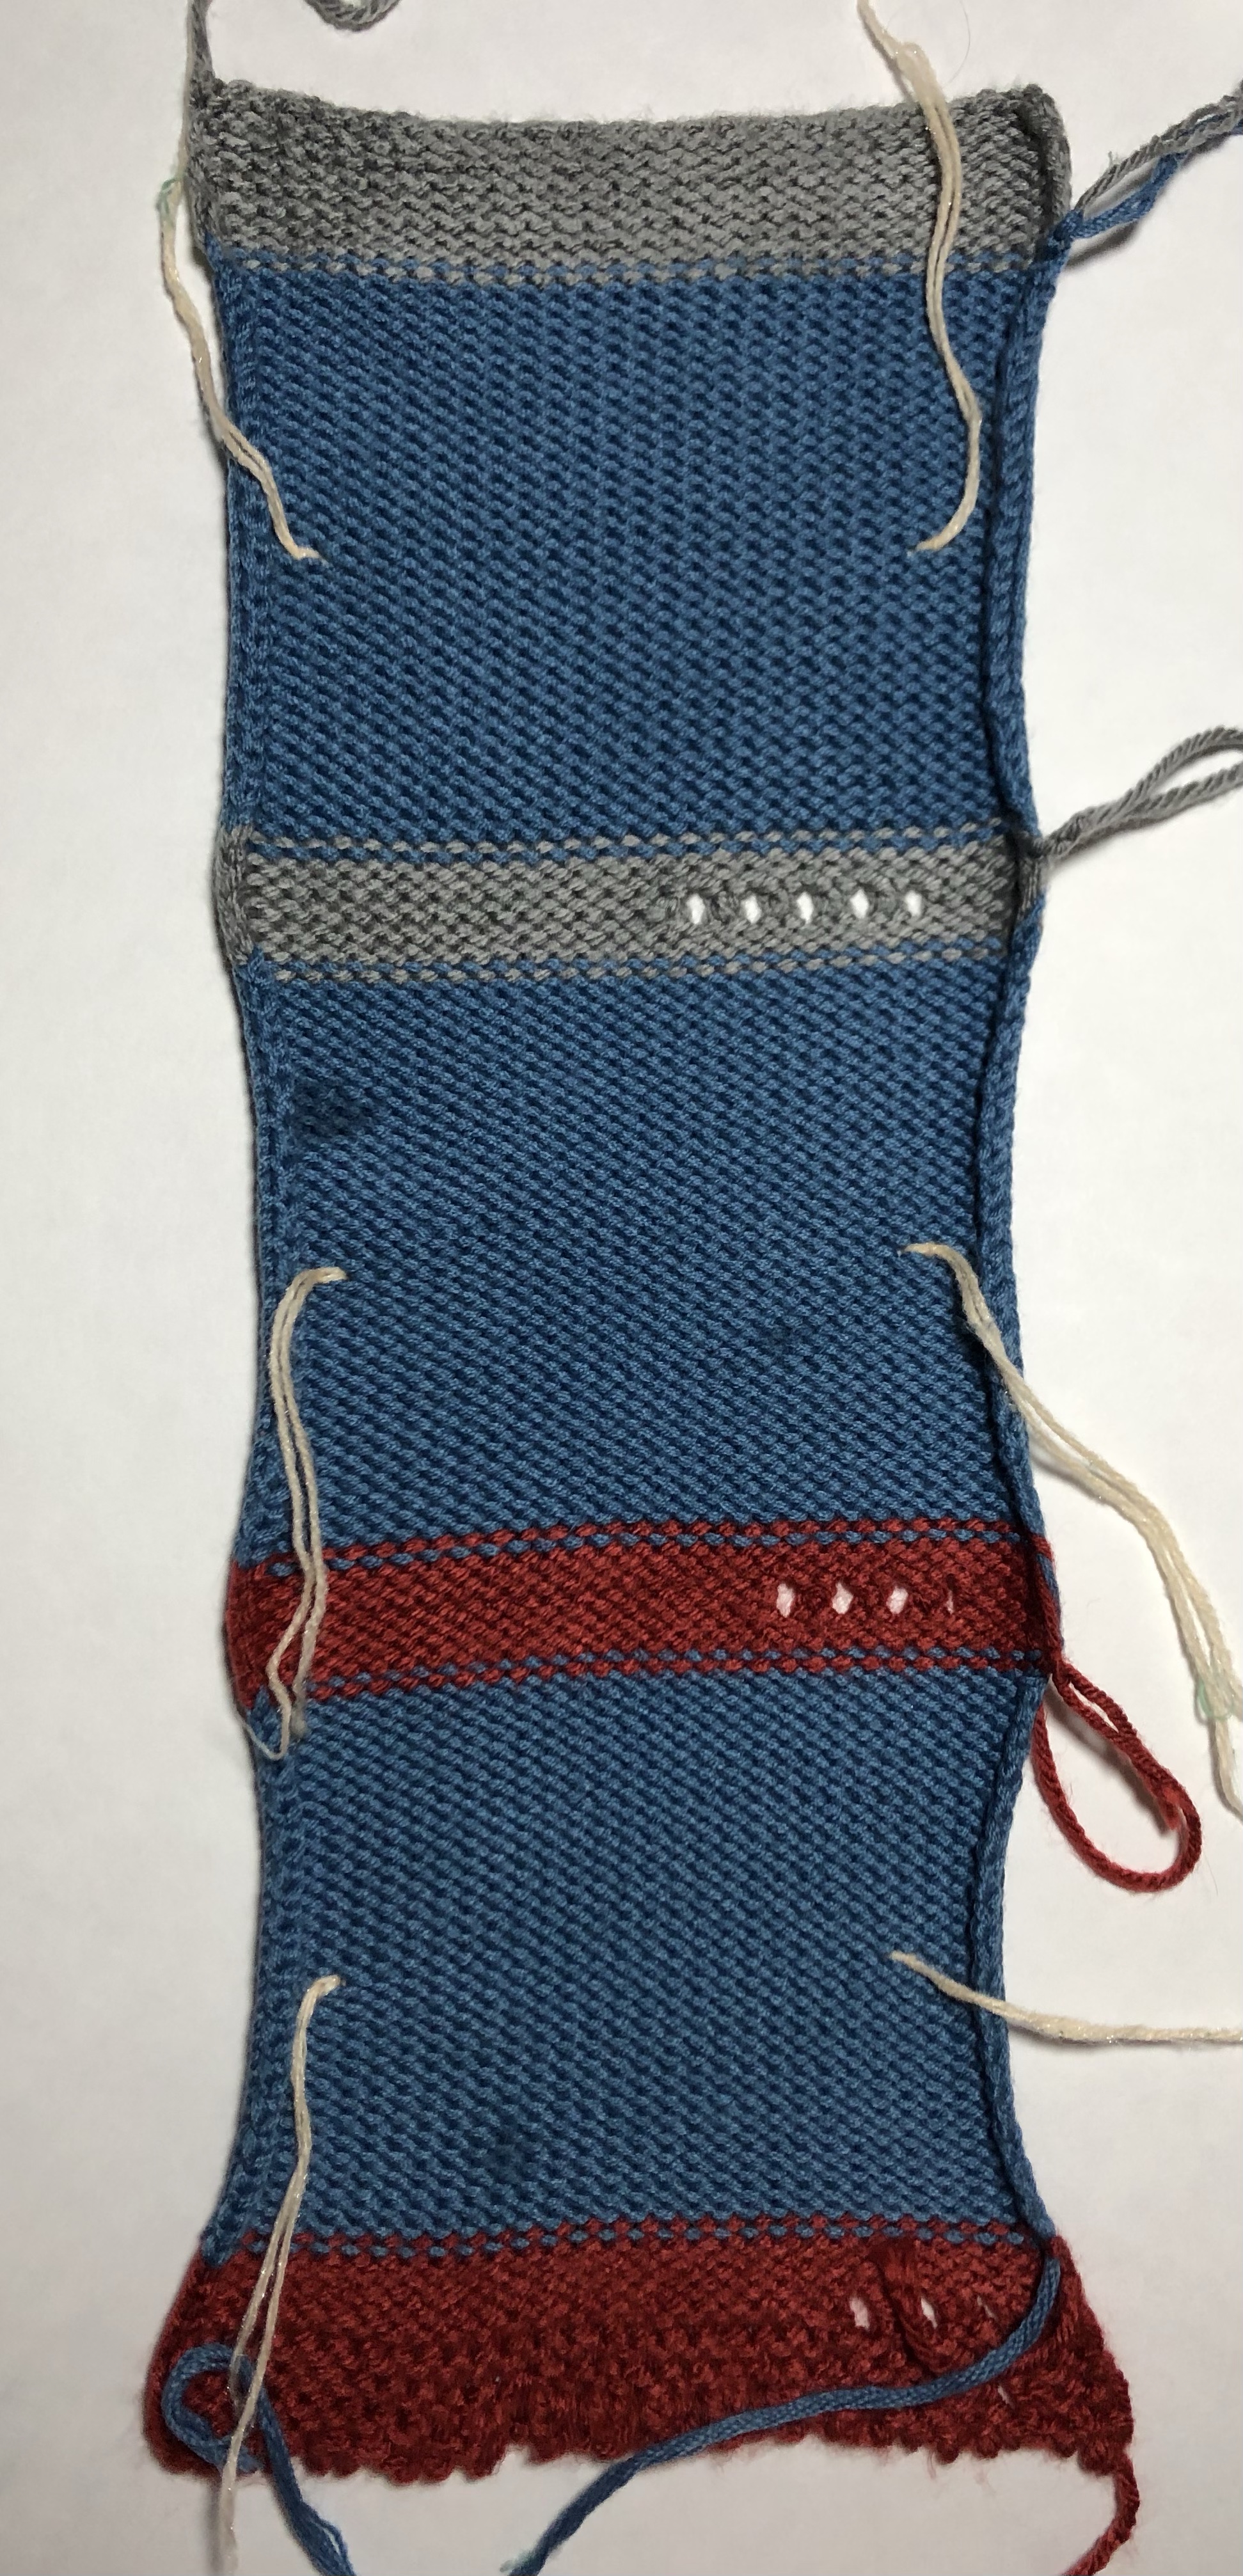
Eyelet code marks rows in the bottom of the scrap yarn, and you can clearly see the beginning and end of the main yarn on the purl/wrong side of the swatch.
Materials
- Main Yarn (to be swatched)
- Scrap yarn of similar size but contrasting color. It should be able to handle the wash/dry/blocking you plan for the main yarn
- Knitting machine set to tension of choice with coordinating latch tool, transfer tools, weights, and cast-on accessories
- Metal, Plastic, or Wooden Ruler (not a tape measure, which can stretch with use and time)
- Straight Pins
- Towel or blocking board
Skills Needed
- Cast On
- Using Weights
- Using Transfer Tools to make eyelets
- Using Latch Hook Tool
- Switching Yarn Colors
- Cast Off
How To for Standard Gauge Machines
Cast on 60 stitches with your cast-on of choice in scrap yarn. (L30 to R30 on your needle bed)
Hang your cast-on comb and weights as you normally would.
Knit 2-4 rows.
About 4-6 stitches from the right side edge of the work on your machine, use a transfer tool to make eyelets equaling number of stitches for each number in your machine’s model number, skipping 3-4 stitches in between each number.
Examples:
Make eight eyelets, three plain stitches, nine eyelets, three plain stitches, and then one eyelet for the machine model KH-891.
Make one eyelet, three plain stitches, then five eyelets for the model LK-150.
Knit 2-4 rows.
About 4-6 stitches from the edge, make the number of eyelets that equals the number setting on the tension dial that you are swatching, e.g., five eyelets for Tension 5, eight eyelets for Tension 8, etc.
Knit 2-4 rows.
Switch to Main Yarn.
Knit 30 rows.
Using scrap yarn and your latch hook, secure the scrap yarn around the stitch on needles L21 and R21. There should be 40 stitches between the marked needles. If you wish, pull these stitches all the way out to HOLD position on your machine to ensure they knit.
Knit until you have completed 60 rows in Main Yarn.
Switch to Scrap Yarn.
Knit 2 rows.
*From this point, you may repeat the process from the eyelet row that marks the tension dial number if you wish.*
Knit a total of 4-6 rows after Main Yarn.
Bind off using bind-off of choice.
Measure stitch and row gauges before blocking and record those measurements.
Wash and Block swatch as you intend to wash and block your project. Consider hanging weights (machine weights or fishing line weights work well) to mimic how the bulk of a larger garment might wear.
Measure stitch and row gauges AGAIN after you have washed and blocked your swatch. Record your measurements. Note any shrinkage, yarn performance, and anything you noticed about the yarn along with your measurements.
Always work from your finished swatch measurements.
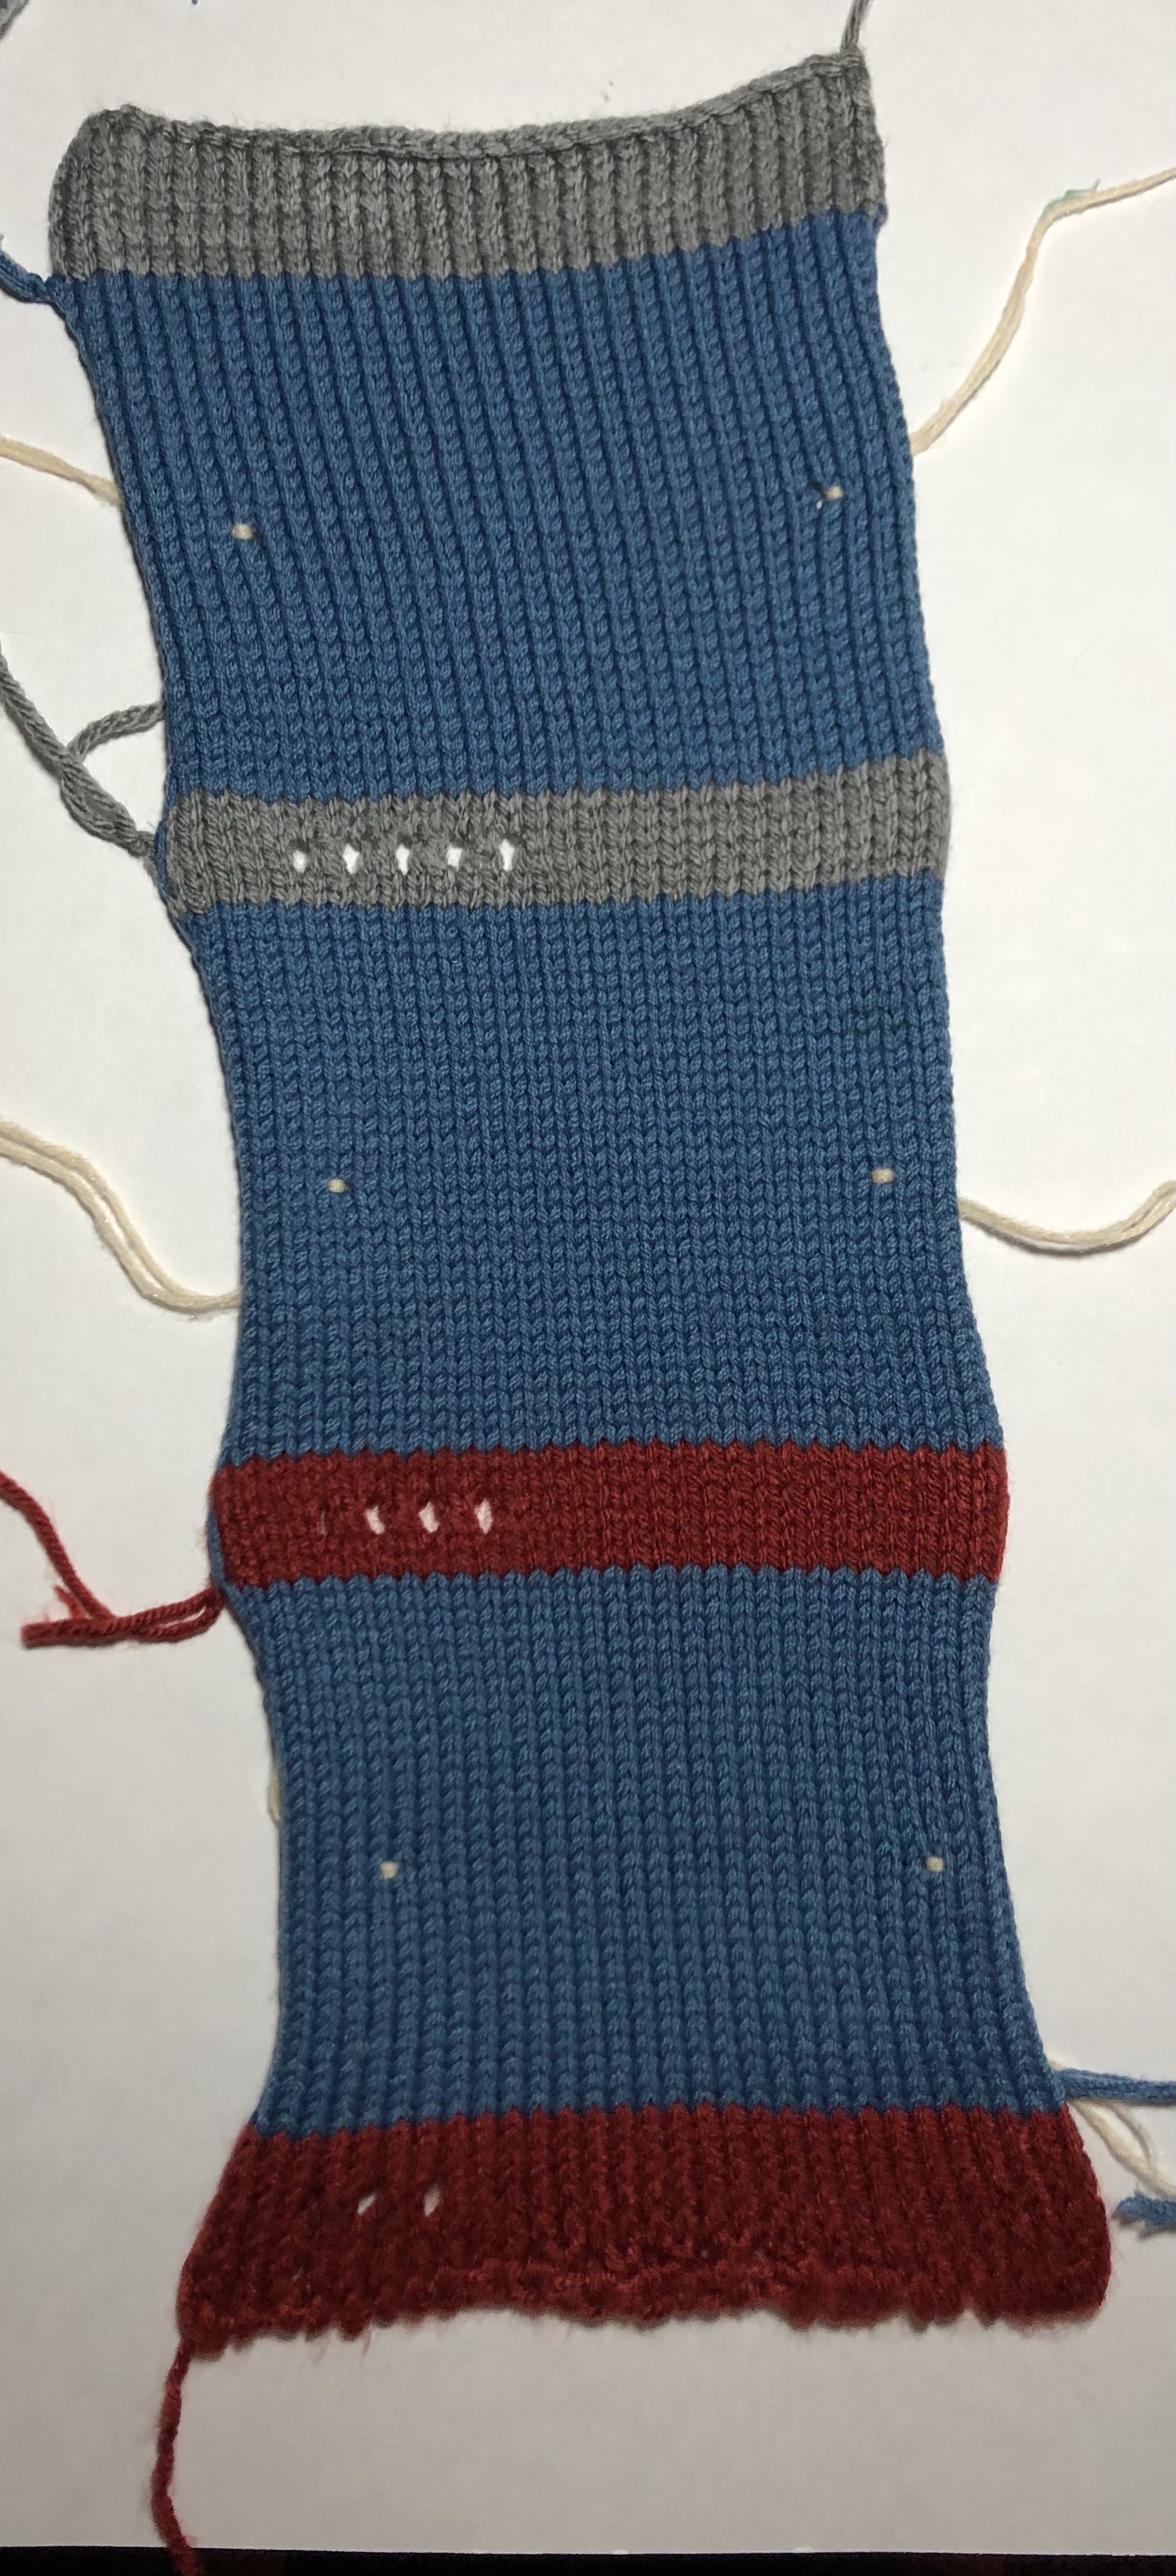
This yarn swatch is Berroco Comfort in Color 9747 “Cadet.”
You can see eyelet rows denoting tension size changes in the red or grey scrap yarn between the blue main yarn.
You can see wrapped stitches denoting 20 stitches between markers.
(I apologize for the messy cast on that obscures the machine model number code row. This was knitted on the LK-150.)
Measuring Your Swatch
Gather your swatch, straight pins, ruler, and blocking mat or towel.
When you measure, your swatch should be on a flat surface and unstretched. Pin it to the blocking board or towel for stability so it will not move while you measure, but don’t stretch it out.
Stitch Gauge:
Measure with the knit side of the fabric facing up.
The stitches wrapped in scrap yarn always denote 40 stitches between them for standard gauge swatches or 20 for mid-gauge and bulky swatches, but the wrapped stitches can distort the stitches next to them a bit. Simply move your ruler a couple rows down and measure between the marked stitches.
Record your measurements! I use a binder. Some people prefer to write notes in their ravelry.com yarn stash pages. Whatever you do, keep a record of your measurements.
Keep your swatch! Do you need to meet a specific stitch gauge from a hand knit pattern that you’re translating to the machine, but it’s given over a different number of stitches? Just count them out on your swatch and go from there!
Row Gauge:
Re-pin your swatch with the purl side of the fabric facing up. Do not stretch out your swatch. You can clearly see the purl bumps of color where the main yarn begins and ends. Using your ruler in the middle of the swatch, measure from the start of the main color purl bump to the last of the main color purl bump.
Record your measurements and keep your swatch! This is so helpful in the long run, so I will keep stressing this!


As you can read from the code rows’ eyelets, this was knitted on the LK-150 at Tension 5.
How To for Mid-Gauge and Bulky Gauge Machines
Cast on 30 stitches with your cast-on of choice in scrap yarn. (L15 to R15 on your needle bed)
Hang your cast-on comb and weights as you normally would.
Knit 2-4 rows.
About 3-5 stitches from the right side edge of the work on your machine, use a transfer tool to make eyelets equaling number of stitches for each number in your machine’s model number, skipping 3-4 stitches in between each number.
Examples:
Make eight eyelets, three plain stitches, nine eyelets, three plain stitches, and then one eyelet for the machine model KH-891.
Make one eyelet, three plain stitches, then five eyelets for the model LK-150.
Knit 2-4 rows.
About 3-5 stitches from the edge, make the number of eyelets that equals the number setting on the tension dial that you are swatching, e.g., five eyelets for Tension 5, eight eyelets for Tension 8, etc.
Knit 2-4 rows.
Switch to Main Yarn.
Knit 15 rows.
Using scrap yarn and your latch hook, secure the scrap yarn around the stitch on needles L11 and R11. There should be 20 stitches between the marked needles. If you wish, pull these stitches all the way out to HOLD position on your machine to ensure they knit.
Knit until you have completed 30 rows in Main Yarn.
Switch to Scrap Yarn.
*From this point, you may repeat the process from the eyelet row that marks the tension dial number if you wish.*
Knit 4-6 rows.
Bind off using bind-off of choice.
Measure stitch and row gauges before blocking and record those measurements.
Wash and Block swatch as you intend to wash and block your project. Consider hanging weights (machine weights or fishing line weights work well) to mimic how the bulk of a larger garment might wear.
How To Modifications for Hand Knitting
Skills needed:
Cast on
Knit
Purl
Stockinette stitch
Yarn Over (YO)
Knit 2 together (k2tog)
Bind off
Instructions:
With scrap yarn, cast on 30 stitches.
Knit 2 rows in stockinette stitch.
On the Right Side or Knit Side of the swatch, perform a “Code Row” by creating the number of eyelets that equals your knitting needle size.
For example, on a size 6 needle:
Knit 4 stitches, (YO, k2tog) six times, and knit to end.
Knit two more rows in stockinette stitch.
Switch to Main Yarn.
Knit 15 rows. Use a small piece of scrap yarn to mark the fifth and twenty-sixth stitches by wrapping them with the waste yarn and looping it on itself or tying it in a knot around the stitch.
Knit 15 more rows for a total of 30 rows with main yarn.
Switch to Scrap Yarn. Knit 2 rows or Repeat from “Code Row” with another size needle.
Bind off.
Notes
Feel free to fiddle with the number of scrap yarn rows in between your main yarn as long as you leave some space around the eyelet rows to allow for any distortion they might cause in your fabric. Sometimes I will knit more rows and sometimes I want to do as few as possible.
If you’re working with a limited amount of yarn, you can always unpick your swatch and use it, but you should try to buy enough yarn to keep your swatches as reference. If you’ve recorded your measurements in a safe space, I suppose you don’t have to keep your swatch around if you don’t want to.
I store my swatches in an old Lebkuchen-Schmidt Nuremburg tin, but you could graft your swatches together to make pet shelter blankets or use them for coasters if you know you’ll never need them again. (Oh the sadness of discontinued yarns!)
How do you swatch on your machine? Do you use this method or something similar? Do you save your swatches? What about favorite yarns? Are there any you return to that would benefit from swatching this way? Let me know in the comments!

Credits and Sources
Pamela Carrico of CMO Designer Knits— my knitting machine teacher, mentor, and friend.
Diana Sexton Designs of Lafayette, IN– handout packet pages 57-58, “Security Scarfs.” I was unable to locate an online presence.
“How to use your Knit-Leader” KL-116 manual, page 7. You can find various machine and accessory manual PDFs at machineknittingetc.com.

Leave a comment