
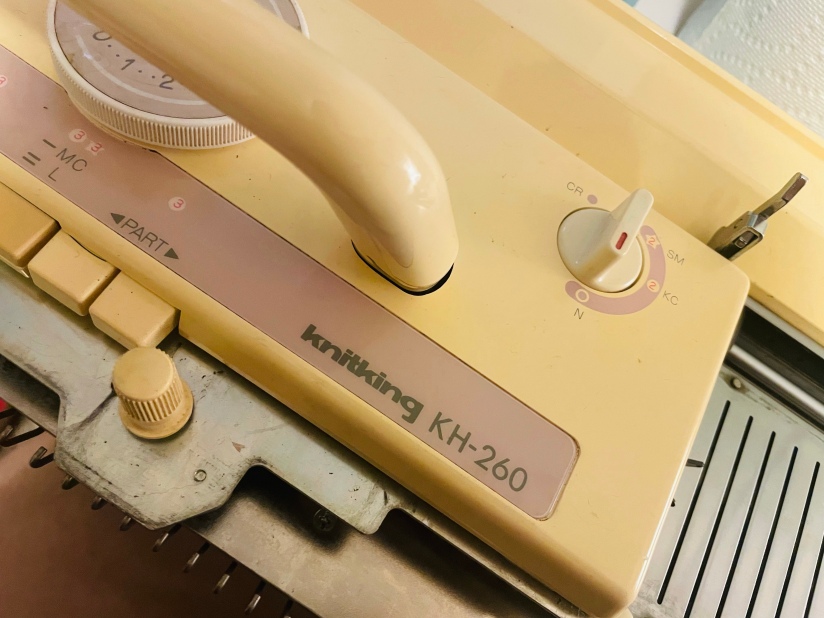
Meet one of my newest machines, the Brother/KnitKing KH-260. It’s a 9mm bulky gauge metal bed machine with punchcard capabilities that can do fair isle, punch lace, tuck, slip stitches, and more. With the right attachments, you can knit intarsia colorwork and ribbing.
This machine was definitely on my WANT list, and my mentor saved it for me when it came to her after its owner passed away.
I don’t know much of this machine’s history other than it was said to be well used and loved. I don’t know how long it sat in storage or where its missing bits are, but I’m happy to have it in my growing (although don’t tell that part to my family) machine collection.
This series isn’t really a tutorial, more of a progress log, but I’ll include links to resources I’ve used along with descriptions of my process and things I’ve learned along the way. Things might be a bit jumbled since this is my first true restoration and I don’t know some of what I’ll need to know yet, but I hope you enjoy it, and I hope you learn something fun and interesting along the way.
Welcome to my first restoration project!
Before I began cataloguing what I had, I went to MachineKnittingEtc.com to find PDFs of the instruction manual, the parts list, and the service manual for this model. (The site is an amazing resource, so be sure to take some time to browse it. It isn’t just instruction manuals, as you can see in this brief overview post.)
This lovely machine doesn’t look much different than what she did out of the box other than her yellowed color. ABS plastic normally yellows due to time, UV exposure, and bromine in the plastic’s composition. That’s just cosmetic, and it’s to be expected for a machine around 30 years old. There are ways to bleach the plastic, but it will re-yellow with time, and the plastic bleaching process could potentially weaken it. There’s nothing wrong with yellowing.
This baby is missing a few parts, though. The rod of the tension mast is missing along with the take-up spring (the antennae-like part) of the mast. The yarn-holder part of the tension mast seems to be part of a color changer with four yarn hole options and not the two-holed part that came standard with the machine. The needle bed number-marking sheet is present but not attached, and most of the accessories are missing.
Fortunately, those parts are generally inexpensive and fairly easy to find and replace on eBay or Etsy. For the accessories, I can just borrow them from my other bulky machine, the Brother KH-230.
With parts catalogued and manuals in hand, it was time for a clean.
This poor girl was dusty. I used LPS-1 wipes to remove most of the dust and grime from the needle bed and used a can of the same chemical to spray down the carriage after carefully removing the plastic casing. I used tweezers to remove what dust bunnies I could and waited for the LPS-1 to reveal more.
You can definitely use the LPS-1 from the spray can with a non-lint cloth to wipe dust and grime away, but I bought a few wipes to try them out and to reach the free shipping threshold. (We Millennials do love our free shipping, after all.) I bought mine from EMI Supply (non-affiliate link).

If there’s one thing I’ve learned so far about knitting machine cleaning, there is always more dust or grease somewhere. Once you spray a machine down with LPS-1, the buildup just starts seeping out of every crevice.
The carriage tuck button was stuck due to gunk and grime, so I used a few drops of Marvel Mystery Oil to help that get moving. That stuff works miracles.
I learned how to clean knitting machine carriages from this Answer Lady Ask Jack video. I recommend watching all of their videos if you have an interest in machine knitting maintenance and repair!
After replacing the sponge bar with a new one and borrowing the tension mast and accessories from my Brother KH-230, I set up the KH-260 for plain knitting.
Things were going well until I attempted patterning with a punch card.
As you can see from my Instagram clip, there’s something pretty wrong with my punchcard unit!
One pass of the carriage resulted in way too many row advances of the punchcard.
And the needle selection? That was a mess, too. Some needles in the center of the 24 stitch pattern never selected.
Let me back up a bit.
Since plain knitting was fine, I went straight to patterning with tuck stitch with plans to go to skipstitch afterwards because I saw on someone’s Instagram post (I’ll update with a link if I can find it again!) that tuck and/or skip stitches really show what a machine can do and point out any faults in its performance.
I removed the test knitting from the needle bed and took the sinker plate off of the carriage so I could see the movement of the needles clearly. (You can do this to find the center of a pattern or where the repeat starts when your machine is working normally if you want to be precise about pattern placement.)
After that, I took off the card stop lever knob and panel covering the card reader unit on the right side of the machine.
I used a small screwdriver that came with a nail polish display rack kit, so I’m not sure what size it was other than perfect for knitting machine maintenance. I will figure out the screwdriver size and update later with details.

As seen in the picture below, the card reader has cracks in the rotary cam (the ivory colored barrel-shaped part). These cracks are likely due to expansion and shrinkage from being stored in a hot attic or garage. There are also cracks along the opposite side.

The plastic direction indicator piece that shows which direction the carriage goes was broken and had disappeared into the void of the machine. The timing belt guide plate to the right of the rotary cam is very loose (as you’ll see in the second video embedded above with my Instagram post). I’m not sure if it’s supposed to be that loose, but I did end up removing it and replacing it as one of the screws holding it was barely in its designated hole.

I used long tweezers from my nail art kit to help me position the screws. Definitely add a pair of these to your machine knitting kit when you can. They’ve been incredibly handy in fishing for dropped parts or reaching into tight spaces.
According to the maintenance manual and Ask Jack videos, the timing belt seems to be timed correctly, so that is a bit of a relief, but I’m not quite sure what to do next. The looseness of the timing belt guide plate seems to be a problem. Placing my hand on it so that it can stop the turning of the punch card clutch gear seems to solve the issue of the card reader turning too many times, but only in one direction.
The carriage also makes a loud CLUNK as it passes across the needle bed when it is in patterning mode. That’s not right, either.
At this point, I don’t know enough about knitting machine maintenance to fix the patterning issue, so I’m actively reading through parts and service manuals, Ask Jack articles, and old forum posts to learn more.
My standard gauge Brother KH-890 machine also has a punchcard unit, so I plan to remove the panel and watch how that machine works in hopes they are similar enough for me to find a clue on how the KH-260 should behave. The loose timing belt guide plate might not actually be an issue.
While I’m figuring out what to do about the punchcard unit, I’ve removed all of the needles from the needle bed for a quick wipe down with LPS-1, and I’ll use needle-nose pliers to straighten any that are bent. I’ll also straighten a couple crooked gate pegs at the end of the needle beds.

I keep all of the needles, screws, and miscellaneous pieces in the same glass jar so nothing will be lost. Now all I have to do is keep my cat away from the jar and we’ll be in a good place regarding loose pieces!
Progress So Far
| Problem | Action | Completed |
| Missing Accessories/Tension Mast Parts | Buy on eBay or Etsy | |
| Dirty Carriage | LPS-1 and Marvel Mystery Oil cleaning |  |
| Dirty Needle Bed | LPS-1 Wipe Down | |
| Dead Sponge Bar | Install replacement | |
| Missing Punchcard Indicator Piece | Buy Replacement/Install | / X |
| Cracked Rotary Cam | Determine if it works as is or needs to be replaced | |
| Loose Timing Belt Guide Plate | Determine if it’s a problem- Watch KH-890 | |
| Needles Not Patterning Correctly | Inspect Card Feeding Unit and Needle Selecting Units, then ??? | |
| Punchcard Reader Turning too much | Inspect Card Feeding Unit and Needle Selecting Units, then ??? | |
| Carriage CLUNK | No. Idea. Blame the Punchcard Unit? | |
| Crooked Needles | Remove and straighten with pliers | |
| Crooked Gate Pegs | Straighten with pliers |
I have a lot left to learn, but there are still things I can do at my current skill level. In between internet sleuthing sessions, I’ll be straightening needles and hunting dust bunnies.
And despite that list of problems, this machine still works. I can still do those fancy skip and tuck stitches, but I’ll have to do the needle selection myself. Being a bit of a lazy knitter, that is less than ideal, but I can still use this wonderful machine.
Thanks for coming on this knitting machine repair journey with me! I’m so excited to learn more about knitting machines through restoration. If you have any tips, tricks, or experience to share, be sure to leave a comment below or email me through the contact page!


Leave a comment