Uncategorized

Free Machine Knitting Pattern: Sarah in Lace

Hello all, and here’s to another happy day of knitting!

Did you see last month’s free hand-knitting pattern, the Sarah in Lace cowl? I am so grateful for all of the wonderful feedback I’ve received about this piece.

Thank you all for your support!

This month, it’s the machine knitting version’s turn!

Sarah in LaceMachine Knitting Version

Ideal for hand dyed or natural yarns with slight color gradient, this cowl will let the yarn speak for itself. Cables on each side create a scalloped, slightly rolling edge without allowing the normal roll of stockinette stitch.

The simple lace repeat is suitable for beginners familiar with the latch tool and transfer tools.

The length and width are easy to modifyโ€“just add lace repeats to achieve your desired size, but note that adding repeats will require more yarn.

Gauge is not vital to this project, but you do not want a tight fabric.


This is the machine knitting version of this pattern.

Visit this post if you’re looking for the hand-knitting version.


Written and Charted Instructions

The lace chart and simplified instructions are on one page (page 5) to be printer-friendly for more experienced knitters, and detailed written instructions for newer knitters follow.

In the written instructions section, I take you step-by-step through the first lace row and the first cable row. The other lace and cable rows build off of those techniques, but are not explained in detail, needle number by needle number.


Decrease Choices

Like its hand-knitting sister, this PDF pattern contains modification tips to help you really make this piece your own.

There are different choices of decreases with instructions for each.

On the left, you’ll see the original decrease intended for the pattern. The detailed row instructions in this pattern assume you are using this decrease.

The yellow sample pictured on the right shows two other decrease options-one on the left of the sample and one on the right. Instructions are provided for this decrease in the pattern notes but not the detailed row instructions like the original decrease.


Pattern Repeat Tip

Mark it up!

Use a set of wet erase markers like Expoโ€™s Vis-ร -Vis markers (non affiliate link) to denote cabled stitches, purl stitches, or central stitches of the lace pattern repeat on the bed of your knitting machine. This can help you remember where to start each lace repeat, which stitches to ladder down to latch up as purl, and which direction cable crosses should go.

In this picture, I’ve used an “X” across two needles to denote the center of the lace pattern repeat’s “V” shape. A bullet marks the needle that I need to ladder down and latch up purl stitches on, and diagonal arrows and “CC” for “cable cross” remind me which direction the four-stitch cable over those needles needs to go.

Wet erase markers work great for any project with pattern repeats and are easy to remove once you’ve finished. Have you given them a try yet?


You can find this pattern in my Ravelry Store as a Free Ravelry Download.

This pattern is available to non-Ravelers, too, so donโ€™t worry about signing up unless you want to. download now


As always, please contact me if you find anything missing or notice an error in my patterns. I will correct them ASAP.


Thanks for coming on this machine knitting journey with me! If you like what you see and want to help me bring more machine knitting content, please consider supporting me on Ko-fi.

Uncategorized

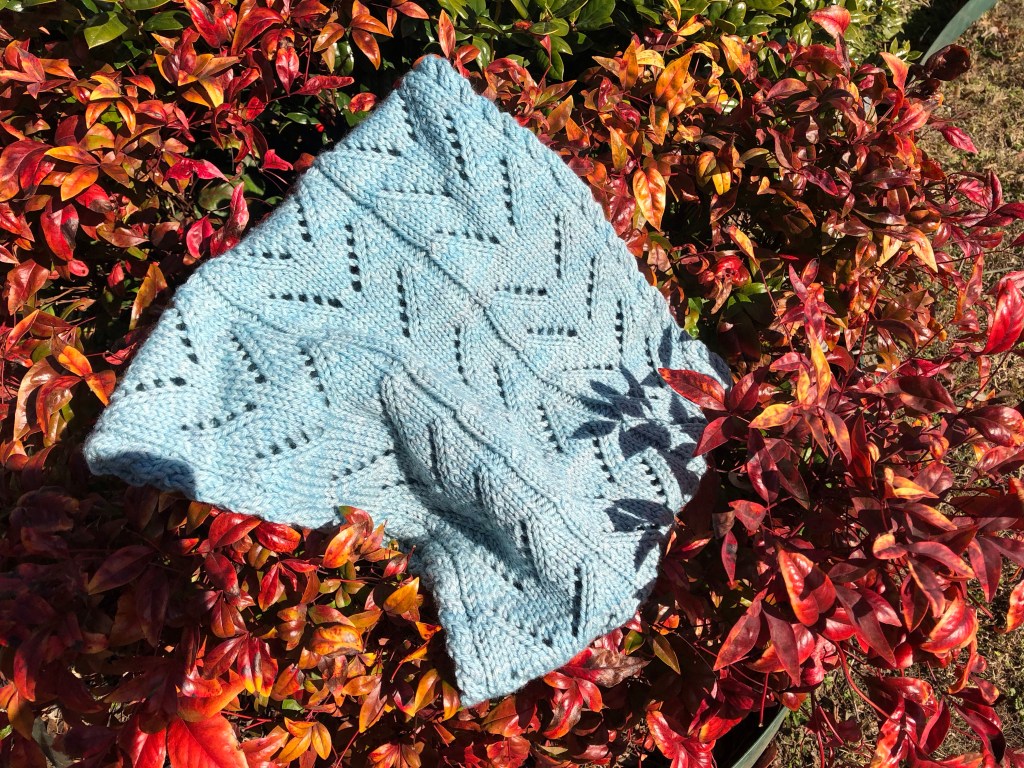
Free Hand-Knitting Pattern: Sarah in Lace

Hello all, and happy Friday!

Today I’m sharing the first of many patterns on the new site! Meet

Sarah in Lace

Ideal for hand dyed or natural yarns with slight color gradient, this cowl will let the yarn speak for itself.

The simple lace repeat is suitable for confident beginners familiar with yarn overs, decreases, and simple cables.

Cables on each side create a scalloped, slightly rolling edge in place of the standard garter stitch edging. The length and width are easy to modify–just add lace repeats to achieve your desired size.

Gauge is not vital to this project, but you do not want a tight fabric.

This pattern includes tips on how to modify the edging cables as well as how to adjust both length and width, but please note adding repeats will require more yardage.

This is the hand knitting version of this pattern. (But don’t worry, if you don’t want to translate it to the machine yourself, the machine knitting version will be out soon!)


You can find this pattern in my Ravelry Store as a Free Ravelry Download right here!

It’s available to non-Ravelers, too, so don’t worry about signing up unless you want to. All the pattern details and updates are on the Ravelry page along with extra pictures.

You can also click this link to download now.


A little about the design…

I designed this cowl for my lovely friend Sarah of DoubleDutchYarn back in the fall of 2019 for a juried craft show she was featured in. A lot of life has happened since then, and I’ve learned to take better and more numerous photos.

Here is the only one I have of the original Sarah in Lace cowl!

This creamy alpaca goodness was so soft. It draped like a dream. I just couldn’t help rubbing my face on it, which was a bad idea since I’m allergic to alpaca! The temptation of that delicate yarn halo was just too much.

Poor Sarah felt so bad when I told her about my eyes watering while I wore a bandana over my face to knit this up, but she didn’t know about my allergy, and my fellow allergy sufferers know some things are just worth it.

Sarah offers small batch, locally curated yarns. When you shop with her, you’re supporting local farmers, millers, dyers, and of course, designers like me.

And be sure to stay tuned! This isn’t the only time Sarah and I have collaborated with yarn!

Uncategorized

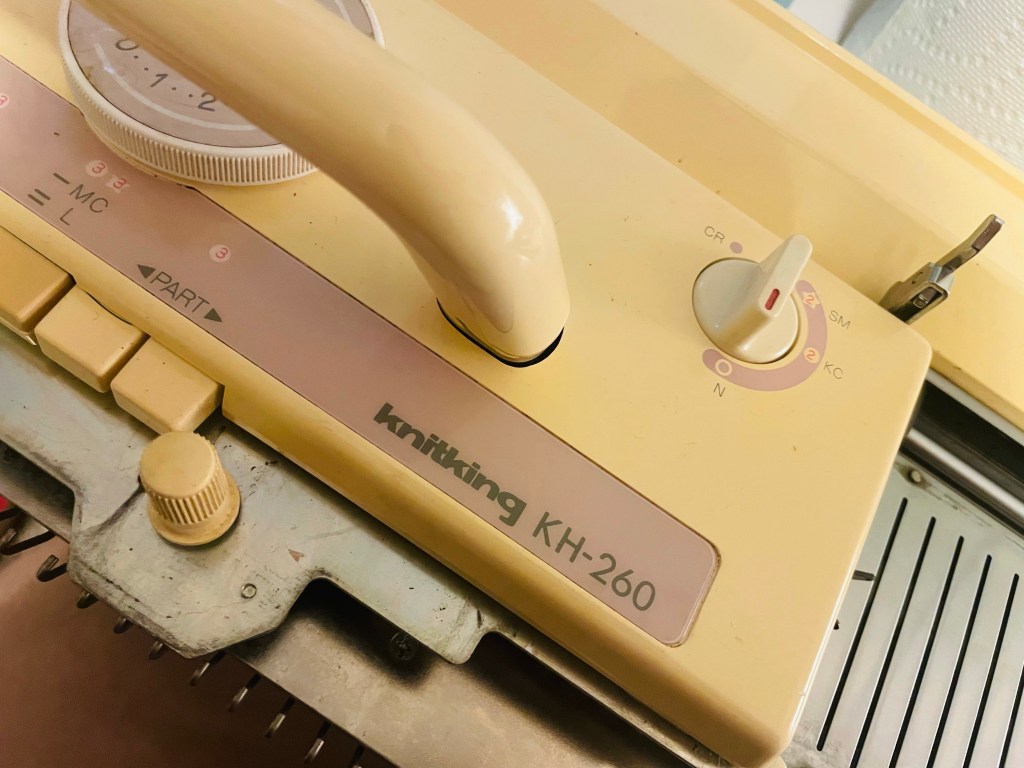
Knitting Machine Restoration: Part One

Meet one of my newest machines, the Brother/KnitKing KH-260. It’s a 9mm bulky gauge metal bed machine with punchcard capabilities that can do fair isle, punch lace, tuck, slip stitches, and more. With the right attachments, you can knit intarsia colorwork and ribbing.

This machine was definitely on my WANT list, and my mentor saved it for me when it came to her after its owner passed away.

I don’t know much of this machine’s history other than it was said to be well used and loved. I don’t know how long it sat in storage or where its missing bits are, but I’m happy to have it in my growing (although don’t tell that part to my family) machine collection.

This series isn’t really a tutorial, more of a progress log, but I’ll include links to resources I’ve used along with descriptions of my process and things I’ve learned along the way. Things might be a bit jumbled since this is my first true restoration and I don’t know some of what I’ll need to know yet, but I hope you enjoy it, and I hope you learn something fun and interesting along the way.

Welcome to my first restoration project!


Before I began cataloguing what I had, I went to MachineKnittingEtc.com to find PDFs of the instruction manual, the parts list, and the service manual for this model. (The site is an amazing resource, so be sure to take some time to browse it. It isn’t just instruction manuals, as you can see in this brief overview post.)

This lovely machine doesn’t look much different than what she did out of the box other than her yellowed color. ABS plastic normally yellows due to time, UV exposure, and bromine in the plastic’s composition. That’s just cosmetic, and it’s to be expected for a machine around 30 years old. There are ways to bleach the plastic, but it will re-yellow with time, and the plastic bleaching process could potentially weaken it. There’s nothing wrong with yellowing.

This baby is missing a few parts, though. The rod of the tension mast is missing along with the take-up spring (the antennae-like part) of the mast. The yarn-holder part of the tension mast seems to be part of a color changer with four yarn hole options and not the two-holed part that came standard with the machine. The needle bed number-marking sheet is present but not attached, and most of the accessories are missing.

Fortunately, those parts are generally inexpensive and fairly easy to find and replace on eBay or Etsy. For the accessories, I can just borrow them from my other bulky machine, the Brother KH-230.


With parts catalogued and manuals in hand, it was time for a clean.

This poor girl was dusty. I used LPS-1 wipes to remove most of the dust and grime from the needle bed and used a can of the same chemical to spray down the carriage after carefully removing the plastic casing. I used tweezers to remove what dust bunnies I could and waited for the LPS-1 to reveal more.

You can definitely use the LPS-1 from the spray can with a non-lint cloth to wipe dust and grime away, but I bought a few wipes to try them out and to reach the free shipping threshold. (We Millennials do love our free shipping, after all.) I bought mine from EMI Supply (non-affiliate link).

If there’s one thing I’ve learned so far about knitting machine cleaning, there is always more dust or grease somewhere. Once you spray a machine down with LPS-1, the buildup just starts seeping out of every crevice.

The carriage tuck button was stuck due to gunk and grime, so I used a few drops of Marvel Mystery Oil to help that get moving. That stuff works miracles.

I learned how to clean knitting machine carriages from this Answer Lady Ask Jack video. I recommend watching all of their videos if you have an interest in machine knitting maintenance and repair!

After replacing the sponge bar with a new one and borrowing the tension mast and accessories from my Brother KH-230, I set up the KH-260 for plain knitting.

Things were going well until I attempted patterning with a punch card.

As you can see from my Instagram clip, there’s something pretty wrong with my punchcard unit!

One pass of the carriage resulted in way too many row advances of the punchcard.

And the needle selection? That was a mess, too. Some needles in the center of the 24 stitch pattern never selected.

Let me back up a bit.

Since plain knitting was fine, I went straight to patterning with tuck stitch with plans to go to skipstitch afterwards because I saw on someone’s Instagram post (I’ll update with a link if I can find it again!) that tuck and/or skip stitches really show what a machine can do and point out any faults in its performance.

I removed the test knitting from the needle bed and took the sinker plate off of the carriage so I could see the movement of the needles clearly. (You can do this to find the center of a pattern or where the repeat starts when your machine is working normally if you want to be precise about pattern placement.)

After that, I took off the card stop lever knob and panel covering the card reader unit on the right side of the machine.

I used a small screwdriver that came with a nail polish display rack kit, so I’m not sure what size it was other than perfect for knitting machine maintenance. I will figure out the screwdriver size and update later with details.

As seen in the picture below, the card reader has cracks in the rotary cam (the ivory colored barrel-shaped part). These cracks are likely due to expansion and shrinkage from being stored in a hot attic or garage. There are also cracks along the opposite side.

The plastic direction indicator piece that shows which direction the carriage goes was broken and had disappeared into the void of the machine. The timing belt guide plate to the right of the rotary cam is very loose (as you’ll see in the second video embedded above with my Instagram post). I’m not sure if it’s supposed to be that loose, but I did end up removing it and replacing it as one of the screws holding it was barely in its designated hole.

I used long tweezers from my nail art kit to help me position the screws. Definitely add a pair of these to your machine knitting kit when you can. They’ve been incredibly handy in fishing for dropped parts or reaching into tight spaces.


According to the maintenance manual and Ask Jack videos, the timing belt seems to be timed correctly, so that is a bit of a relief, but I’m not quite sure what to do next. The looseness of the timing belt guide plate seems to be a problem. Placing my hand on it so that it can stop the turning of the punch card clutch gear seems to solve the issue of the card reader turning too many times, but only in one direction.

The carriage also makes a loud CLUNK as it passes across the needle bed when it is in patterning mode. That’s not right, either.


At this point, I don’t know enough about knitting machine maintenance to fix the patterning issue, so I’m actively reading through parts and service manuals, Ask Jack articles, and old forum posts to learn more.

My standard gauge Brother KH-890 machine also has a punchcard unit, so I plan to remove the panel and watch how that machine works in hopes they are similar enough for me to find a clue on how the KH-260 should behave. The loose timing belt guide plate might not actually be an issue.

While I’m figuring out what to do about the punchcard unit, I’ve removed all of the needles from the needle bed for a quick wipe down with LPS-1, and I’ll use needle-nose pliers to straighten any that are bent. I’ll also straighten a couple crooked gate pegs at the end of the needle beds.

I keep all of the needles, screws, and miscellaneous pieces in the same glass jar so nothing will be lost. Now all I have to do is keep my cat away from the jar and we’ll be in a good place regarding loose pieces!


Progress So Far

ProblemActionCompleted
Missing Accessories/Tension Mast PartsBuy on eBay or Etsy
Dirty CarriageLPS-1 and Marvel Mystery Oil cleaningCheck mark, Wingdings font, character code 252 decimal.
Dirty Needle BedLPS-1 Wipe DownCheck mark, Wingdings font, character code 252 decimal.
Dead Sponge BarInstall replacementCheck mark, Wingdings font, character code 252 decimal.
Missing Punchcard Indicator PieceBuy Replacement/InstallCheck mark, Wingdings font, character code 252 decimal./ X
Cracked Rotary CamDetermine if it works as is or needs to be replaced
Loose Timing Belt Guide PlateDetermine if it’s a problem- Watch KH-890
Needles Not Patterning CorrectlyInspect Card Feeding Unit and Needle Selecting Units, then ???
Punchcard Reader Turning too muchInspect Card Feeding Unit and Needle Selecting Units, then ???
Carriage CLUNKNo. Idea. Blame the Punchcard Unit?
Crooked NeedlesRemove and straighten with pliers
Crooked Gate PegsStraighten with pliers

I have a lot left to learn, but there are still things I can do at my current skill level. In between internet sleuthing sessions, I’ll be straightening needles and hunting dust bunnies.

And despite that list of problems, this machine still works. I can still do those fancy skip and tuck stitches, but I’ll have to do the needle selection myself. Being a bit of a lazy knitter, that is less than ideal, but I can still use this wonderful machine.


Thanks for coming on this knitting machine repair journey with me! I’m so excited to learn more about knitting machines through restoration. If you have any tips, tricks, or experience to share, be sure to leave a comment below or email me through the contact page!

Uncategorized

The Basket of Shame

It started out with good intentions as “the finishing basket” when I was working on inventory before a craft show.

I’d knit a few washcloths then finish out the day with a cowl or shawl. I’d put them in the finishing basket and weave in the ends later as I watched the news. Then they’d go off to the wash and eventually be blocked and inventoried away.

It was a good system.

Then that cute little cardigan needed some buttons, but USPS was delayed, so it went to the basket.

Then I didn’t feel like finishing the fringe on a self-fringing shawl, so it went into the basket.

Then something interrupted me as I was weaving in ends, so that project went into the basket. Just for a little bit.

Then the craft show was cancelled and other shows followed suit.

The finishing basket was moved to the completely easy-to-see-and-not-forget corner of the yarn closet, and there weren’t any shows coming up anyway….

It was fine, right?

Here I am, a year later, with an overflowing finishing basket. The Basket of Shame.

Oops?

Is it too late for “oops?”


the Basket of Shame Overfloweth

I want to call myself as a professional knitter.

And professionals finish their work, right?

So what am I doing with this pile of stuff?

I’m honestly more than a little embarrassed about it.

How did I let it get this bad? I was home all the time for over a year. There was time to get this done!

That’s not to say that I didn’t finish some things, because I did. But that basket pile still grew….


If you’re like me and some of your works-in-progress have transformed into UFO’s (un-finished objects), I’m here to tell you that it’s OK. It happens. You’re not alone here.

It’s OK to put things down for good reasons, silly reasons, or even no reason at all.

But.

It is important to pick them back up again.

Try not to be too hard on yourself. The UFOs were put away. It happened. Can’t change it.

Now, what I can do, what you can do, is pick up one of those UFOs and work on it.

Little by little, it’ll get done.


If you have some WIPs-turned-UFOs, why don’t you join me in finishing things up? Accountability helps, you know. ๐Ÿ™‚


UFO sighting! Nearly finished curly-fringed shawl and Kelso tank top

I’ll go first.

Here’s my UFO list and what each one needs to join my list of finished works.

  • Teal Gradient Shawl – 25% left of curly fringe, final block
  • Flame Gradient Shawl – initial block, straight fringe, final block
  • Turquoise Socks – mattress stitch ribbing of 2nd sock, weave in ends
  • Green Baby Surprise Sweater – edging, ends, buttons, final
  • Grey Baby Surprise Sweater – ends, buttons, final block
  • Grey Tank Top – armhole ribbing, side seams, ends, final block
  • Black and Pink Scarflette – ends, final block
  • Yellow and Orange Ear-flap hat – felting
  • Coral skirt – elastic waistband
  • Clapotis Scarf – blocking
  • Washcloth 1 – ends
  • Washcloth 2 – ends
  • Orange Mittens – seaming, ends of second mitten
  • Lavender Mittens – seaming, ends, actually make the second mitten
  • Faux ‘Fair Isle’ Socks – make second sock, seaming, ends
  • Fingerless Mitts – second thumb gusset, ends

Whoa. Sixteen projects with varying degrees of completion. A couple of them go more than a year back. Yikes. Others are SO close to the finish line it’s silly to think I stopped where I did.

On top of that, I found four completed projects in that basket! I don’t remember even making them!

I’m not proud that these projects ended up this way, but this is do-able. The Basket of Shame kept growing because I felt overwhelmed and anxious, and I just froze and tried to ignore it.

But that’s OK! Because I’m here now doing and improving, and I’m not going to stop. Now that basket can go back to just being a basket.

nearly finished UFO – Baby Surprise cardigan, machine knit version


What UFOs are floating around your house? Why don’t you join me in taking care of them?

Thanks for reading. See you next time!

Uncategorized

What Does Brother Punch Card 1M Look Like?

Punch cards for knitting machines are magical, but have you ever had trouble visualizing the patterns they make?

Those holes and spaces don’t translate to much inside my head for anything but fair isle patterns. Even though I know what tuck and skip stitches are, I just can’t see them.

Brother Punch Card 1M

That’s where a reference scarf comes in! Like the security scarf discussed in this post about gauge swatching, having a reference scarf with all of a punch card’s options featured can really come in handy, especially for design purposes.

If you don’t want to make your own reference scarf, I’ve got you covered. This post includes pictures from the knit and purl sides of all compatible functions of Card 1M except Plating Tuck Stitch; that is, all functions you can do by pressing buttons or toggling switches without changing any parts of the carriage.

The knit side is not always the right/public side of the work with these stitches, so I will be using “knit side” to reference the side of the work that always faces away from you while you knit it on the machine. “Purl side” references the side of the work that always faces toward you as you knit.


Function compatibility guide for Series M – scan from Brother KH-890 manual

The Brother M series of punch cards came with the KH-890 and KH-891 models. You can find the M series here from Machine Knitting Etc and punch them on a blank card if you do not want to look for them premade on eBay or another site.

I knitted these swatches from blue and white mystery acrylic yarns similar to Millor Piropo at Tension 10 on my Brother KH-890 machine.


Tuck Stitch

knit side
purl side
purl side of elongated pattern between stockinette stitch

Two Color Tuck Stitch

knit side
purl side

Skip Stitch

knit side
purl side
purl side between regular stockinette stitch

Fair Isle

knit side
purl side
knit side, elongated pattern
purl side, elongated pattern
knit side, card frozen on odd row
purl side, card frozen on odd row

Knit Weaving

knit side
purl side

I hope you found these pictures helpful in visualizing what Brother Card 1M can do. I will be upgrading my photography setup in the near future, but for now, please enjoy a bonus photo of my cat about to destroy my DIY light box. At least she’s beautiful!

The Destroyer

Do you have any tips or tricks for visualizing punch card patterns? What do you use for design references? What other things would you like to see on the blog? Let me know in the comments below!

Uncategorized

Yarn Review: Silk City Fibers Cotton Bambu

Silk City Fibers is a wholesale coned yarn retailer that boasts more than 50 types of luxury yarn for knitting and weaving. Known in the past for their 100% rayon chenille yarn, they became part of Orchard Yarn & Thread Company, Inc., better known as Lion Brand Yarn Company in 2019. Perhaps due to the pandemic, in 2020, they opened up their online store and no longer require a wholesale account to purchase their yarns.

Cone put-up allows for much more yardage per item, and though the price per cone may seem daunting at first, remember to consider price per yard and the amount needed for your project. If you’re really buying in bulk, Silk City Fibers offers a discount after 7 cones and even more after 15 cones.

I remember hearing and feeling some concern about Silk City Fiber’s “luxury” yarn status when learning of their purchase by Lion Brand, but instead of seeing much of a change in Silk City Fibers, I have noticed a positive trend in Lion Brand Yarn’s lines with nicer, softer acrylics and new, sustainable and/or recycled yarn blends.

As a former yarn boutique employee, I’ll admit to some yarn snobbery. I’ll also admit that I wrote off Lion Brand Yarns very soon after I started knitting because I did not like what they offered, but my, have things changed for the better since then.

I’ll be reviewing more Lion Brand Yarns and Silk City Fibers offerings in the future, so stay tuned, but for now, here’s one of my Silk City favorites:

Cotton Bambu


All opinions are honest and my own. I am not affiliated with any company or individual mentioned or linked unless otherwise noted. I purchased this yarn myself and did not receive compensation for this review.


Silk City Fibers Cotton Bambu Color 016 Orangeade in different lighting to demonstrate slight sheen from rayon-bamboo

About Silk City Fibers Cotton Bambu

Fiber Content51% Cotton, 49% Bamboo-based Rayon
Yardage/Meterage1,050 yards per pound
Ounces / Grams1.2 lbs
Yarn Weight*3 / Light / DK
Made in**
AvailabilityOnline, some LYS or Weaving shops
Put upCone

*There is not a yarn weight listed for this yarn. Instead, you can estimate its yarn weight by “wraps per inch” around a standard No. 2 pencil or comparing it to yarns with known sizing.

**I was unable to find an exact location where this yarn is made, but many Silk City Fiber and Lion Brand products are made in China or in America with source fibers from varying countries.

Cotton Bambu comes in a very limited color palette of 12 solid colors. There is a slight sheen in the yarn due to the bamboo-rayon, as seen on the right in the picture comparison above. Allergy sufferers or those who are averse to animal fibers will enjoy the smooth cotton and bamboo-based rayon fiber content.

At 1,050 yards per pound and 1.2 lbs per cone, you’re looking at just over 1,200 yards per cone and around $0.25 per yard.

You can purchase Cotton Bambu from both the Silk City Fibers and Lion Brand Yarns websites. Your local yarn or weaving shops might carry Silk City Fibers yarns, but stockists are not listed on either brands’ website. You may be able to find old colorways or fiber combinations through Etsy or eBay sellers.


Care Guide

Hand WashYes
Machine WashYes
Flat DryYes
Machine DryYes

When I first purchased color cards and then cones, this yarn was recommended dry clean only, so I’m glad to see its updated care status listed online.

Cotton Bambu machine washes and dries very well, but it is important to always work from measurements from a washed and dried swatch to account for any changes or shrinkage that could possibly occur in the wash.

If you decide to lay it flat to dry, know that it will take quite a while to dry fully and you may need to flip it so the underside is not damp. I noticed after steaming garments, so they were not soaked as they would be in a wash cycle. This is not unusual for cotton yarns as they are very absorbant.


Knitting Machine Compatibility

4.5mm Standard GaugeYes
6.5mm Mid-GaugeYes
8mm / 9mm Bulky GaugeYes

This yarn works well at upper tensions on the 4.5mm standard gauge machine and works well with the ribber attachment. I most frequently use it on my mid-gauge SilverReed LK-150. I have not used it on a bulky machine, but it is an appropriate weight and would likely work well on any bulky depending on what fabric you are looking to create.


Swatches, Performance, and Blocking


If youโ€™re curious about how I swatch yarn, please read this post.


Stripes of various Cotton Bambu colors from a work-in-progress

Cotton Bambu runs smoothly through the machine and patterns well using a punch card. It makes a nice rib using the ribber attachment. If you need to rip out work due to a mistake, it loses a bit of its twist. Loose ends will un-twist and fray due to being a smooth, plant-based fiber, so be sure to securely weave in ends before washing.

If your cat decides to claw up a cone, the individual threads that make up the yarn will run and pull for a bit, so be sure to keep your yarn safe from predators when photographing and storing! I assume catching this yarn on needle hooks might have similar results with individual threads of the yarn pulling.


Mid-gauge SilverReed LK-150 swatch at Tension 4, washed cold on gentle and dried on low:

BeforeAfter
20 stitches4″3.875″
30 rows4.5″4″

Cotton generally shrinks some in the wash, but as long as you are working from the gauge of a “finished” or washed and dried swatch, you should not run into problems. (I cannot stress the importance of this enough!)

Though there was some shrinkage, there was minimal to no fuzzing or haloing of the yarn in the wash and no loss of stitch definition whatsoever in my swatches.

Using the above numbers, my swatch shrank about 3% horizontally/stitch-wise and about 11% vertically/row-wise.

If you’re worried about shrinkage, the rayon-bamboo content does more than simply add to a garment’s drape. Cotton Bambu blocks very well and gives you quite a bit of flexibility when it comes to any surprises you might find in your finished garment. I’ve been quite thankful for its blocking ability before when I miscalculated a stitch conversion factor and wound up with a garment that was just a bit too short for my liking.


Standard-gauge Brother KH-890 swatch at Tension 10, washed cold on gentle, dried on low, and gently steamed:

BeforeAfter
40 stitches6.5″6.75″
60 rows6.5″7″

When I say “gently steamed,” I mean that I passed the steamer head above the yarn swatch and used it to iron out wrinkles and unroll the sides of the stockinette stitch swatch. I did not pin or mark desired dimensions and pull or push the fabric to create stretch, I merely used the steam to relax the swatch to see where it would go without coaxing.

You cannot “kill” cotton as you can acrylic, and bamboo-rayon doesn’t quite “kill” like a normal acrylic will and lose all of its elasticity, but steaming Cotton Bambu does increase the drape. The cotton content prevents and protects the rayon-bamboo from behaving as a fully acrylic yarn will.

Using the above numbers for my standard swatch, my steam blocking was able to increase the horizontal/stitch gauge by around 4% and the vertical/row gauge by around 8%. Over something like the 15″ body of a garment, that is an increase of over an inch of length.

Blocking can make a significant difference, and if you need more give than a gentle block, Cotton Bambu will be able to stretch more than I demonstrated, but it does have limits due to the cotton content. I suggest double-checking your math instead of relying on the yarn to save you as I had to do!


Pattern Ideas

I’ve used Cotton Bambu in many projects and have plans for many more for both customers and myself. Click the pattern name for a link to the download page of each pattern.


Left: Kelso by Meghan Kelly (hand-knitting pattern) in Silk City Fibers Cotton Bambu Color 116 Grass. $8.00 USD on Ravelry. Sample knitted on SilverReed LK-150

Right: Mid-Gauge Ladies Lace Yoke Top by Irene Woods (machine knitting pattern). Free from Clearwater Knits. Size XL on a Size L dress form. Sample knitted on SilverReed LK-150

Both of these patterns involve hand-transferred lace. Irene Woods’s pattern includes very detailed information on the lace in a circular yoke for those who have not tried it before.


Lion Brand CoBoo

I have not been able to officially confirm this, but I believe Lion Brand’s CoBoo yarn is Silk City Fiber’s Cotton Bambu yarn.


Silk City Fibers Cotton Bambu and matches in Lion Brand CoBoo

Lion Brand CoBoo comes in 3.5 ounce, 232 yard cakes, is 51% cotton and 49% rayon-bamboo, and has the same care instructions. (The online listing description states 50/50 content, but the actual ball band label reflects the 51/49 ratio.)

While CoBoo comes in 20 colors, it features many exact matches to Cotton Bambu right down to color names (Grass, Steel Blue, and Orangeade are pictured above). It also has the same number of plies and the same twist.

Lion Brand’s website list price is $5.99 per cake, which puts price per yard around the same $0.25 as Cotton Bambu, but you can find it on sale for as low as $2.99 per cake on JoAnn’s website depending on their sale of the week.


Final Thoughts

Silk City Fibers Cotton Bambu is a wonderful yarn, and at $30.99 a cone, it feels pricy. Silk City Fibers touts themselves as a luxury brand, after all, and I feel they live up to it with Cotton Bambu. At around a DK weight, Cotton Bambu makes substantial but not heavy garments appropriate for spring, summer, and fall or year-round wear in warmer climates. Its drape adds to the luxurious and smooth feeling of this yarn against the skin.

For a similar drape and smooth feeling and the same ~1200 yard amount in Berroco Comfort DK, a 50/50 Nylon Acrylic blend with 178 yards per skein at $3.75 per skein, you’d pay around $27.00 (about $0.23 per yard). I think a cotton blend costing about the same as a nice, quality acrylic yarn is a very good deal. (For a review of Berroco Comfort in Worsted weight, check out this post.)

With only 12 colors to choose from, Cotton Bambu has work to do in the color department. Three of the twelve Cotton Bambu colors were added very recently, so I am hopeful for more colorways in the future. Lion Brand’s CoBoo version it better at 20 colors. If you’ll be working with a smaller amount of yardage or you want to do colorwork, I’d opt for the CoBoo version.

In fact, if you simply want to try this yarn before you invest in an entire cone, I recommend choosing the CoBoo version first.

Cotton Bambu is a wonderful yarn and one of my absolute favorites overall for any type of knitting, but price and limited color palette affect its rating when I look at it more objectively. The fact that a more colorful and widespread/readily available through big box craft store version is around detracts a bit from its rating, for me. Combining all of that with great drape, a smooth and sleek feel, and a decent price, I give Silk City Fibers Cotton Bambu a 3/5.


Have you used Silk City Fibers Cotton Bamboo before in your machine knitting? What about in your hand knitting or weaving? What kind of projects did you use it for, and what did you think of its performance?

Are there other properties or categories you think I should include in my yarn reviews? What yarn should I review next? Let me know in the comments!

Uncategorized

Finding Machine Knitting Patterns on Ravelry

From colorwork trends to brioche fads, you can find nearly everything knitting, crochet, or yarn-related on ravelry.com. I’ve been a user for years now, and I can spend hours looking through patterns, projects, and yarn pages.

Ravelry has over 600K hand knitting patterns and is quickly closing in on 400K crochet patterns, but there are only 3,775 machine knitting patterns listed in their database.

screenshot from March 16, 2021

That doesn’t mean you can’t find things to knit on your machine, though! Ravelry’s search feature has a wonderful amount of refinement options.

If you haven’t used their expanded search features before, I recommend reading Ravelry’s own tip articles on refining searches and saved searches.


Here’s how I use Ravelry when I’m looking for patterns to knit using my machines. The process is pretty straightforward, and you’re really only limited by how many modifications or adjustments you’re willing to make so a pattern will work.

This is where you can get really picky about what you what to knit and what you’re willing to do for modifications. Do you want to work with multiple colors? Scroll down the left side and select the number of colors you want to use from the “Colors used (typical)” box. Do you only have a certain amount of yardage in that special skein? Limit your search to a yardage/meterage range.


Craft Type

First of all, try refining by “Machine Knitting” as your craft type! Ravelry is nearing 4,000 machine knitting patterns in their database, after all. The term includes Addi circular knitting machines as well as Circular Sock Machines (CSM), but many patterns will indicate compatible machines in their titles.

If you sort by “New to Ravelry,” you’ll find there are designers like Lauren Riker who regularly upload new patterns. I find that new designs by Machine Knitting Monthly are only sporadically included in the database, though.

If you didn’t find something that spoke to you in the “machine knitting” tag, don’t worry. There are a lot more options out there.


Do the Math with a Schematic

If you know how to use proportions and your pattern has a schematic, you can fill in stitches and rows per inch using the pattern garment’s measurements to fit whatever machine gauge you’d like to use.

Ravelry has the searchable pattern attribute “has schematic” (just start typing it in the search bar and it will pop up), but not all designers will check the box so the database knows this.

I’ll do a more detailed post on knitting math in the future, so stick around if this is something you’re interested in learning more about!


Search Refinement: Yarn Weight

When you’re considering a new project without making anything specific in mind, think about what machine you want to work with and compatible yarn sizes.

If I’m working with my 4.5mm standard gauge machine, I generally select yarn sizes of sport weight and lighter. If it’s my 6.5mm mid-gauge, I select fingering through worsted weights. If it’s my bulky machine, I switch to excluding yarn sizes with the drop-down menu at the bottom of a search refinement box. and remove super bulky from search result possibilities.

Remember to consider the size of the garment you want to make and how many stitches/needles you’ll need. Standard gauge beds have 200 needles. Mid-gauge beds have 150, and Bulky beds have 120. If your pattern needs 300 stitches, you probably need to do some math and play with stitch gauge to make things work.


Search Refinement: “Worked-Flat”

I like to start out my potential machine knitting project browsing sessions with “craft: Knitting, has photo: yes, and attributes: worked-flat” as the minimum search refinements.

If something is worked flat already, you generally don’t have to worry as much about dividing pattern or colorwork repeats.

Some patterns are worked in-the-round and then separated at the arms to be worked flat, but they’ll show up in this search refinement. You can generally divide the total stitch count in half and then work front and back separately and be just fine. I like to add one stitch to each side of the separated halves as a selvedge stitch for later mattress stitching.

Once you’ve found a set of search refinements that fits what you’re looking for, be sure to save your search! Ravelry lets you save multiple searches, so you can select search terms according to your mood and come back to them whenever you want.


First Translations

If you’re worried about converting patterns to your machine or you’re just not sure about your skill levels, first try a knitting project that requires fewer modifications to make it to the machine.

A lot of DK weight patterns are at easily achievable gauges for the SilverReed LK-150 and have stitch counts that fit within your 150 needle limit. If you’re new to translating hand-knitting patterns to machine knitting, this can be a great place to start because you will be able to knit some patterns nearly exactly as written.

The Mojave Collection as seen on ravelry.com

I have knitted most of the patterns from the Mojave Knits Collection by Meghan Kelly on my LK-150 without modifications. I’ve also used some of them on my Brother KH-890 standard gauge at upper tensions. Most of the patterns feature a large amount of stockinette stitch with smaller areas/panels of eyelets that can be easily created with a transfer tool.


Hybrid Knitting

If you also hand knit, consider knitting garter stitch borders or complicated lace repeats by hand and then hanging your work on the machine when you come to a more machine-friendly part.

Don’t limit yourself to one craft just because you think you have to! Machine knitting does some things better than hand-knitting, and hand-knitting does some things better than machine knitting.

For the Alanis Sweater by Elizabeth Smith below, I finished the last few short-rows in the yoke shaping by hand because I didn’t want to worry about wraps and the garter bar. The sweater is knitted in-the-round by hand, but it was easy to separate the sides and add selvedge stitches.

Stay Flexible

When you’re looking at your pattern, keep an open mind. You can always replace hand knit borders with a machine knit variant. Mock rib is simple on the machine and is often included in your machine’s manual. You can ladder down purl stitches and latch them up with the latch tool as knit stitches for true ribbing, or you can use a ribber attachment if your machine has one.

If a lace pattern has purls in it, you can re-form them with the latch hook or simply leave them as-is for your own variation without the purl bump on the right side of the garment. If you don’t want to hand-transfer a lace pattern, consider replacing the lace area with a lace carriage punch card pattern.

If you can crochet, don’t rule out a crochet edging, either!

When you translate and modify a pattern to fit your machines, you really can create something one of a kind.

Because you’re modifying a pattern, remember there’s a chance it might not look exactly like the designer’s original piece. You are completely changing the craft they designed it for, after all. I personally don’t mind differences that might arise when changing crafts because they just add to the originality of the garment.

That being said, sometimes your attempts to modify a pattern won’t work. Whether it’s because of a gauge calculation error, a stitch miscount, or you need to keep working on your machine knitting skills, you might not succeed on your first or second try. Maybe that stitch wasn’t meant to be done by machine.

You might finish a garment and then be hit with something in hindsight that would have worked for your project much better than the choice you made, and that’s OK.

Don’t be afraid to rip out something that doesn’t work! You are allowed to rip it out and start over. If you’re like me and you need permission to undo something you spent a lot of time on, even though it didn’t work, here’s your sign. You can rip it out. It is OK. Learn from it, take a deep breath, and move on. You’re still on the right path and leveling up your skills.


How do you find patterns to knit on your machine? What search refinements do you like to use on ravelry? Do you use another site to find patterns, or do you stick to books and magazines?

Let me know in the comments!

Uncategorized

So you’ve inherited a knitting machine… now what? Starting from Scratch with Machine Knitting.

There are so many things to consider when you find yourself with a knitting machine. What even is it? It says it’s a machine that knits in the name, but how does it do that? What if you don’t hand knit? Where do you find the yarn? How much space is this thing going to take up in the house?

If no one around you knows anything about machine knitting, you’re going to have to do the work yourself to track down the resources (and I’m here to help!). But before you start going crazy with all of the questions a potential new hobby brings, it’s time for the first significant stop in your knitting machine journey.

It’s not Google. It’s YouTube.

Googling your new hobby is a great way to find articles and inspiration, but you’ll often find yourself in too deep and overwhelmed by knowledge and terms when you dive head first into forums and specialized sites. You’ll get there in machine knitting, too, since that initial overwhelmed feeling can happen with every hobby, but stopping and watching first can help you catch your breath.

Take the time to see the possibilities in machine knitting. Try not to let any terms catch you off guard, and make a mental note of anything that catches your interest for later. Remember, you’re just watching for now.


Here are a few videos to get you started:

Machine Knitting a Sweater – Time Lapse by Lorna Watt – Start to finish of a cat sweater

Fruity Knitting Podcast Episode 105 – Interview with machine knitting instructor Susan Guagliumi – This episode is especially good for hand knitters wondering about machine knitting. In addition to a two part interview with Guagliumi, Fruity Knitting interviews a hobby machine knitter who does not hand knit.

Brother KH-860 Knitting Machine Demo by Buckwsr – sampling of many different knitting machine functions


What do you think? Were you inspired? Intimidated?

Machine knitting does have more of a learning curve than hand knitting or other yarn crafts, but don’t let that discourage you. Watching others work will open your mind to the endless possibilities of the craft.

If the dive into machine knitting does become too much, remember, there’s a pause button, and you can always come back later. Those of us in the machine knitting community will be happy to have you join us whenever you’re ready.


Where did your YouTube machine knitting video dive take you? Share some of your favorites in the comments below!

If you’re an experienced machine knitter who didn’t have YouTube when you began, where did you start?