I was playing around on my Silver Reed LK150 a while back and came up with this simple beanie that begs to be customized. This hat has a folded brim and a cinched crown that would look great with an added pompom.
It’s just a rectangle, but it’s the perfect template to doodle around with and try out new things as you develop your machine knitting arsenal of techniques. I hope you enjoy it and put your own spin on it!
Materials
50-150g of Worsted Weight Yarn (Samples use Cascade 220 Superwash Wool at T7) Silver Reed LK 150 6.5mm knitting machine
The Doodle Beanie concept will work with any machine gauge and suitable yarn. Knowing your stitches per inch from swatching yarn is immensely beneficial, so I encourage you to swatch beforehand if you have no clue what yarns knit best at what tensions on your machine.
Pattern Instructions
Set Tension to 7. E-wrap CO 60 (80, 90, 100) stitches.
Brim: Knit 20 (30, 40, 40) rows. Hang hem by picking up the e-wrap and hanging it on the needle above it. Knit 1 row at T9.
Revert back to T7. Reset to RC000
Body: This is the place to experiment with stitch patterns, stripes, etc Knit 20 (30, 40, 40) rows.
Crown: Transfer stitches to EON.
Tension down to T6. Knit 1 row. T5. Knit 1 row. T4. Knit 1 row. T3. Knit 1 row.
Finishing: Do not remove stitches from needles. Leaving a tail long enough to seam the beanie, cut yarn. Thread needle and sew through the live stitches from the opposite side of the tail before removing the beanie from the machine. Cinch the top of the beanie together. Pull tightly but be careful not to break your yarn.
Mattress stitch the sides of the beanie together. Weave in ends. Attach a pompom if you like.
Modification Tips and Ideas
For a rolled brim, halve the number of rows in the brim step and do not hang the stitches.
If you are not comfortable using your transfer tools or are in need of a very quick knit, tensioning down alone will work, but you will need to cinch the top together above the remaining live stitches like the pictures below to close the crown. The density of stitches at the crown is why we decrease to EON.
If you want a bit of a slouchy beanie, you can add 5 rows and skip tightening tension in the crown altogether. It will be easier to cinch the top if you decrease to EON.
Try knitting two strands of smaller yarns together or using variegated yarn to spice up the simplest version of this hat.
Abbreviations
CO
Cast On
BO
Bind Off
WP
Working Position
COR
Carriage on Right
COL
Carriage on Left
EON
Every Other Needle
RC ###
Row Count ###, i.e. Row Count 023
T#
Tension and size number (Tension 1, Tension 2…)
What will you doodle?
Did you knit a Doodle Hat? Please consider sharing your projects on ravelry so I can see what you made. I love seeing project pictures!
If you’d like to help support the site, please consider buying me a Ko-Fi.
As always, thank you for joining me on my machine knitting journey! Let me know what you think below in the comments. I’m also happy to hear from you via my contact form or on Instagram.
I received a few requests for a step-by-step tutorial (a few of which were tied up in spam filters, so my apologies to those of you who haven’t received a reply yet) so here it is!
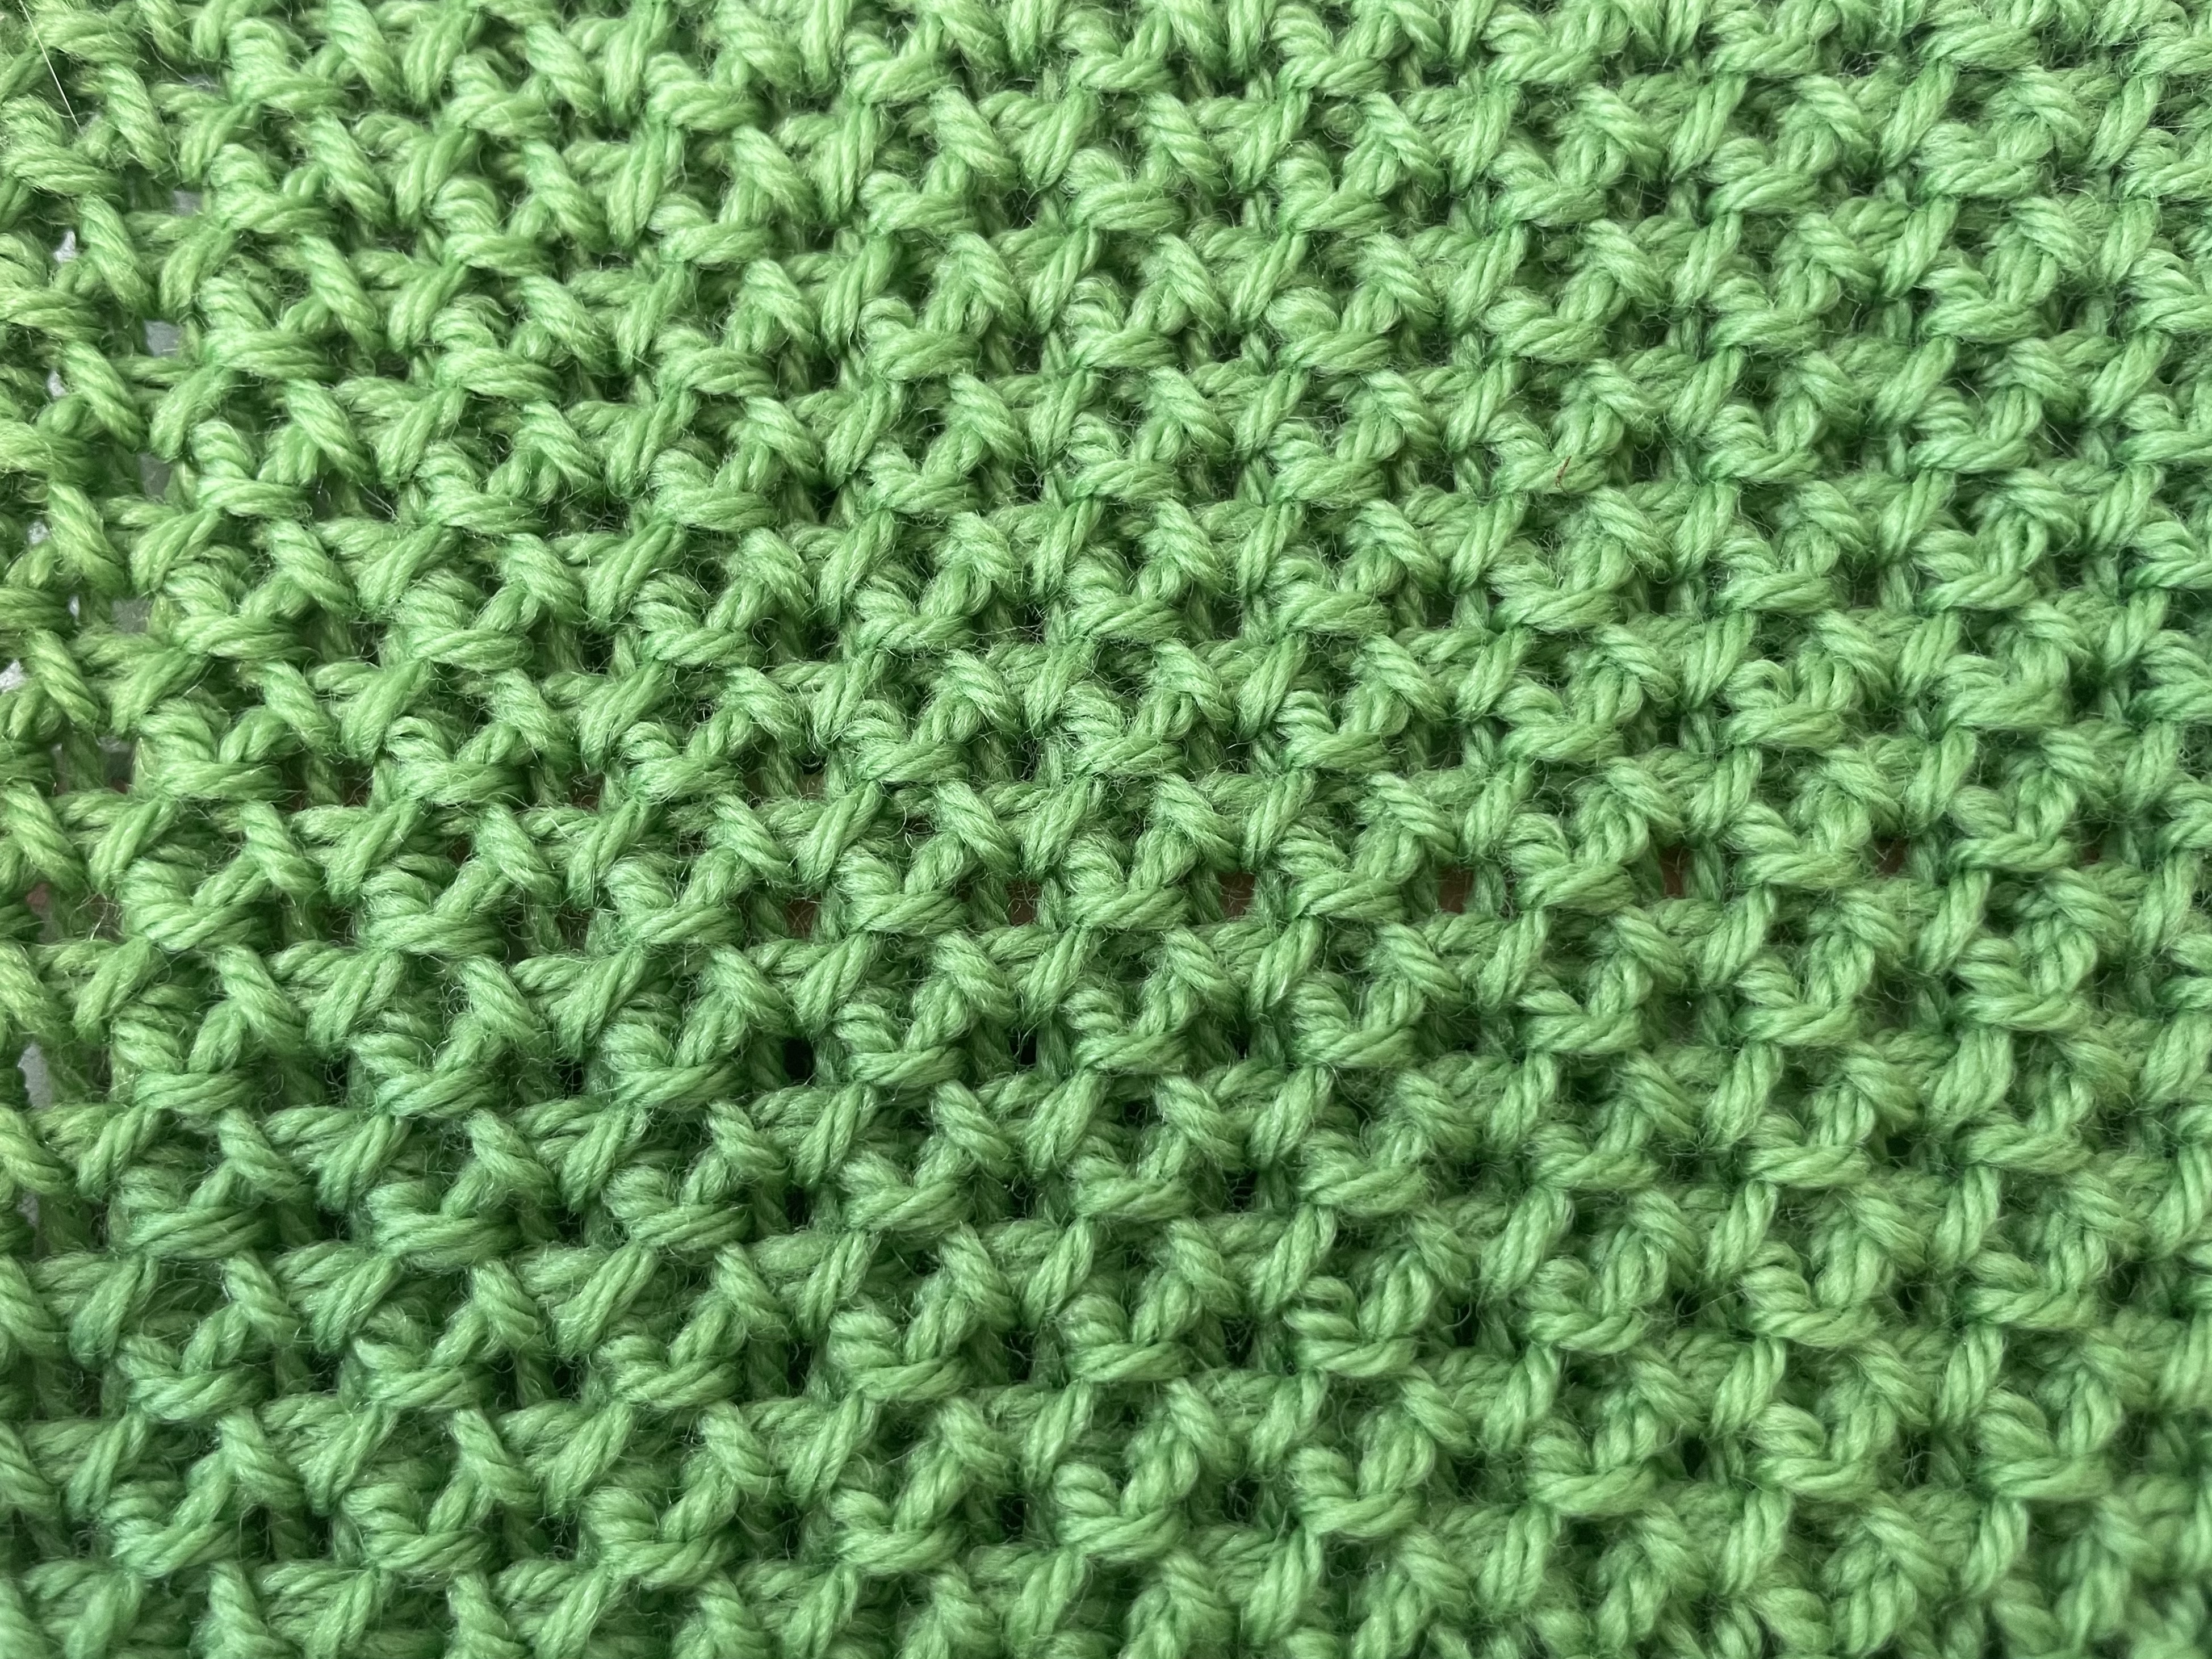
This is a nice introduction to tuck/textured stitches for beginners since needle selection and carriage changes are isolated to the first and fourth row of this four-row repeat.
Check the notes after the pattern if you’re interested in modifications! The abbreviation key also follows the pattern.
Solid vs Multicolor in this textured tuck stitch
Materials
Silver Reed LK 150 6.5mm Mid-Gauge Knitting Machine & Accessories 1 ball Cascade 220 Superwash (or any in the 220 family) -or- 100g worsted weight yarn
Pattern Instructions
Set carriage to Tension 6 or number needed to achieve desired fabric
Initial Setup: 1) E-wrap CO 32 stitches from left to right (16L to 16R). COR 2) Knit 1 row. COL 3) Hang cast on comb and weights. COL 4) Knit 1 row. COR. Reset RC to 000.
Pattern Repeat: Pattern row setup: RC 000. COR. Set Carriage to HOLD. Place EON in hold beginning with the second needle (16R in WP, 15R in HOLD, etc). Last needle on the left (16L) should NOT be in HOLD. You should have two stitches in WP at the left edge.
Knit 3 rows.
RC 003. COL.
Set Carriage to KNIT. Knit 1 row.
RC 004. COR
All needles are now in WP ready for selection for the next repeat.
Repeat from pattern row setup 18 times until RC 072.
Finishing: Knit 1 row. RC 0073.
Perform the Backstitch Bind Off. This can be found in the LK 150 manual on page 38.
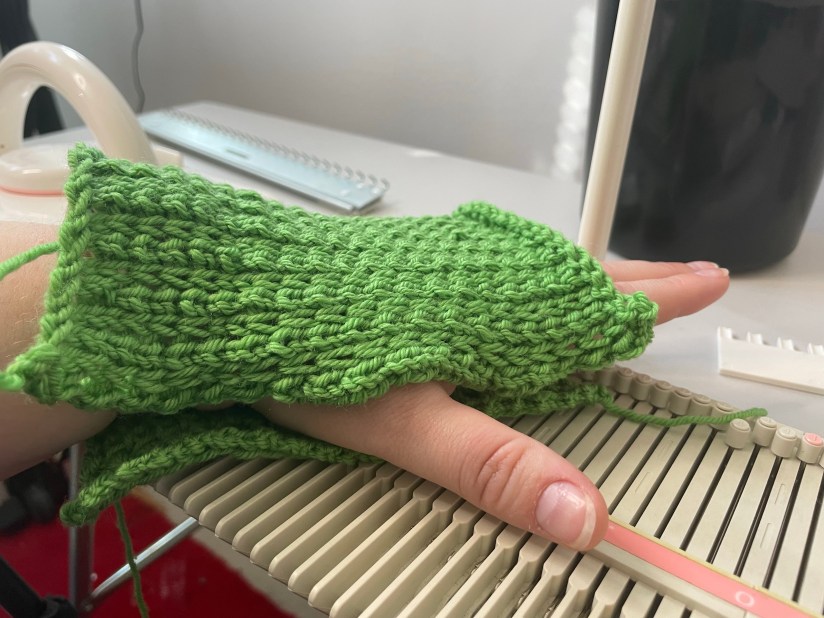
Choose whether you wish to use the purl side (the side that faces you during knitting and the side pictured at the top of the post) or the knit side (looks like a wonky stockinette stitch, pictured just above) as the public/outward facing side of your wristwarmers.
Wrap the rectangle around your hand to determine how much room to leave for your thumb and sew up with a tapestry needle using your stitch of choice.
Repeat for second wristwarmer.
Step-by-Step in Pictures
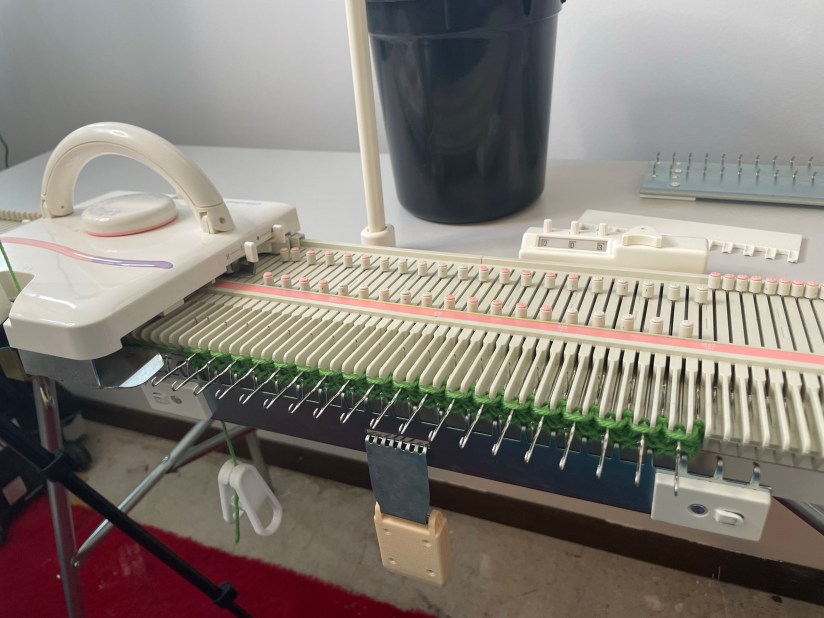
Setup: RC 000. E-wrap CO from left to right. Knit 1 row. Hang cast on comb and weights, being careful not to catch working yarn in the cast on comb.
If you have trouble catching stitches, try pulling the e-wrap forward into the small dip in the needles. Do not pass the latches. (Click to enlarge pictures)
Reset to RC 000. Place EON in HOLD with Carriage set to HOLD before knitting. COR. Knit across.
RC 001. One row knitted. COL EON in HOLD should have a strand of yarn over it.
Knit across.
RC 002. Second row knitted. COR.
EON in HOLD now has two strands of yarn over it.
Knit across.
RC 003. Third row knitted. COL.
*RC 003. Set carriage to KNIT. COL.*
Knit across.
RC 004. Fourth row knitted. COR. Needles are in WP ready to be selected for pattern repeat.
Front view of setup rows plus one pattern repeat
Pattern Notes and Modification Tips
This pattern repeat will work with any machine and appropriately-sized yarn.
Stitch count must be a multiple of 2 + 2. The +2 stitches are seaming allowance.
If you change CO and BO types, make sure to use something stretchy. Tuck is a very horizontally stretchy stitch, and hands are active!
Remember to consider the finished project’s purpose when considering changes to a pattern!
Please consider making a tension swatch before you knit. If you feel like walking on the wild side, note that tuck stitch patterns tend to be shorter and wider than stockinette, so plan on doubling your stockinette row count to reach your desired length.
Weights are very important when knitting tucked stitches. Weight helps the strands over needles in HOLD knit off properly. If you are having issues where stitches aren’t knitting off, try adding weight.
Abbreviations
CO
Cast On
BO
Bind Off
WP
Working Position
COR
Carriage on Right
COL
Carriage on Left
EON
Every Other Needle
RC ###
Row Count ###, i.e. Row Count 023
Did you make wristwarmers using this step-by-step pattern tutorial? Please consider sharing your projects on ravelry so I can see what you made! I love seeing project pictures!
If you’d like to help support the site, please consider buying me a Ko-Fi.
As always, thank you for joining me on my machine knitting journey! Let me know what you think in the comments! I’m also happy to hear from you via my contact form or on Instagram. I believe I’ve fixed the comment/contact spam filter issue, so please don’t let that stop you!
If you have a 6.5mm mid-gauge SilverReed LK-150 knitting machine, this accessory is a must-have!
The Needle Beetle Needle Selector by KrisKrafter makes knitting patterned stitches a breeze. Instead of selecting the whole bed of needles by hand or using a needle pusher,
You hand select the first 8 needles into the arrangement you want, then push the Needle Beetle across the needle bed and it will select the rest of the needles lickety split!
I wanted to knit a full bed tuck stitch baby blanket on my SilverReed LK-150 to go along with my Lion Brand Ice Cream yarn review, but I didn’t want to select every other stitch for two out of three rows using only my needle pusher or my hands.
I can be a patient knitter if I try hard enough, but selecting stitches like that is not my idea of a good time.
Needle Beetle to the rescue!
After finding where I had safely stored it after purchasing it in January (I really need to stop rearranging my craft room), I took it for a test knit.
I love tuck stitch patterns, so the majority of my Needle Beetle usage so far has been tuck stitch work.
front and back of a Nancy Marchant tuck stitch done on the LK-150 using the Needle Beetle in mystery yarn
Since I have a standard gauge punch card knitting machine, I don’t normally do much patterning on my LK-150. I’ll do a bit of cabling or hand-selected lace, but tuck or fair isle? Nah. Why do that on the Lk-150 when I can have my standard machine do it for me?
But talk about fun! I really was missing out on the things the LK-150 can do by ignoring patterned stitches just because I’d have to select by hand or needle pusher.
For the time it saves and the versatility it reminds you the LK-150 already has built in, the Needle Beetle is an amazing and worthwhile addition to your accessory collection.
And for those for those stubborn (ok, I’ll admit it, for me the word is lazy) knitters, you can’t go wrong with the time it will save you for only $89.00.
Troubleshooting User Errors
The Needle Beetle comes with very clear instructions, so I feel like the issues I had with it were entirely my fault.
1. Loose Screw
The Needle Beetle isn’t just for the LK-150 machine. It also works on the LK-140, the GK-370, and the 9mm LK-100/Zippy 90 models. For the KX-350/355/360 machines, KrisKrafter offers the Needle Beetle II, which performs the same as the Needle Beetle but fits those machines.
Since it fits both 6.5mm machine and 9mm machines, the cam inside the Needle Beetle is reversible. You simply flip it over and screw it back in. Since I like seeing how things work, I took mine apart to look at all of the pieces and see how they fit together.
The instructions warn of over-tightening the screw on the cam, but I think I took the warning a little too seriously. At the end of selecting a row of needles, when I picked up the Needle Beetle, the cam, flipper, and other parts kept going!
I ended up having to search my craft room floor for the screw, washer, and cam. And of course my mischievous cat was batting one of the pieces around. (I promise I love her, but she’s about to be barred from the craft room for eternity.)
So do tighten the screw. Don’t over-tighten it. But don’t under-tighten it, either. If it isn’t secure, the motion of the cam selecting the needles will vibrate the screw out of its hole and send you on a quest to find the pieces of this magical accessory.
2. Wrong Track
If you aren’t paying attention and you align your Needle Beetle along the carriage track rather than the track containing the needles, instead of selecting needles from upper working position, it will take out of work needles and push them into work.
Whoopsies!
3. Position Label Sticker
If your LK-150 still has the sticker labeling working positions A, B, C, and D on the right side of the needle bed, you might want to be careful with how you push the Needle Beetle across your machine.
I wasn’t careful, and the Needle Beetle picked up part of the edges of my sticker and eventually took the sticker with it. I don’t need the sticker, so it isn’t a big deal, but if you’d like both ends of your machine bed to look the same, be careful with how you put pressure on the Needle Beetle if you’re using it for full bed patterning and it might come into contact with your position label sticker.
Bonus: Tuck Stitch Baby Blanket Recipe
This tuck stitch baby blanket is a great way to put your Needle Beetle to work!
For this blanket, cast on an odd number of stitches using scrap yarn and ravel cord.
I used 149, nearly the whole bed.
I knitted one row plain and then began my tuck stitch pattern.
This pattern is based off a variation of one of Nancy Marchant’s hand knitting two-color tuck stitches, which I find a bit funny since Marchant herself has mentioned that she once used tuck stitches in machine knitting and developed many of her hand-knitted tuck patterns inspired by machine knitted tuck. We’ve come full circle!
Instead of switching out yarns, I decided to use the multicolor Lion Brand Ice Cream Big Scoop from my earlier yarn review. The yarn is a decent acrylic with fun colors that are perfect for a baby blanket.
Select every second needle of the first eight stitches. Slide the Needle Beetle across the bed to continue the pattern. Every other stitch should be all the way towards you in HOLD position.
** The first and last stitches should not be in hold. They should remain in working position so they are not tucked.
Set Carriage to HOLD.
Knit three rows.
Set Carriage to NORMAL.
Knit one row.
Repeat these four rows until your blanket is your desired size, ending with a plain knit row.
Scrap off or place all needles in HOLD to add edging to live stitches.
I used the “worm” (also called pie crust) edging with six rows knitted on three live stitches before moving to the next three stitches. I skipped rows in between “worms” on the sides of the blanket to mimic the look of the worm edging on live stitches.
Diana Sullivan on YouTube has great edging ideas, so you should definitely go check her out for great how-to videos for edgings.
All opinions are honest and my own. I am not affiliated with any company or individual mentioned or linked unless otherwise noted. I purchased this accessory myself and did not receive compensation for this review.
Do you have a Needle Beetle Needle Selector? What projects have you knitted with it? How do you like it!
Let me know in the comments below!
As always, thank you for coming on this machine knitting journey with me.