Accessories, Knitting Machines

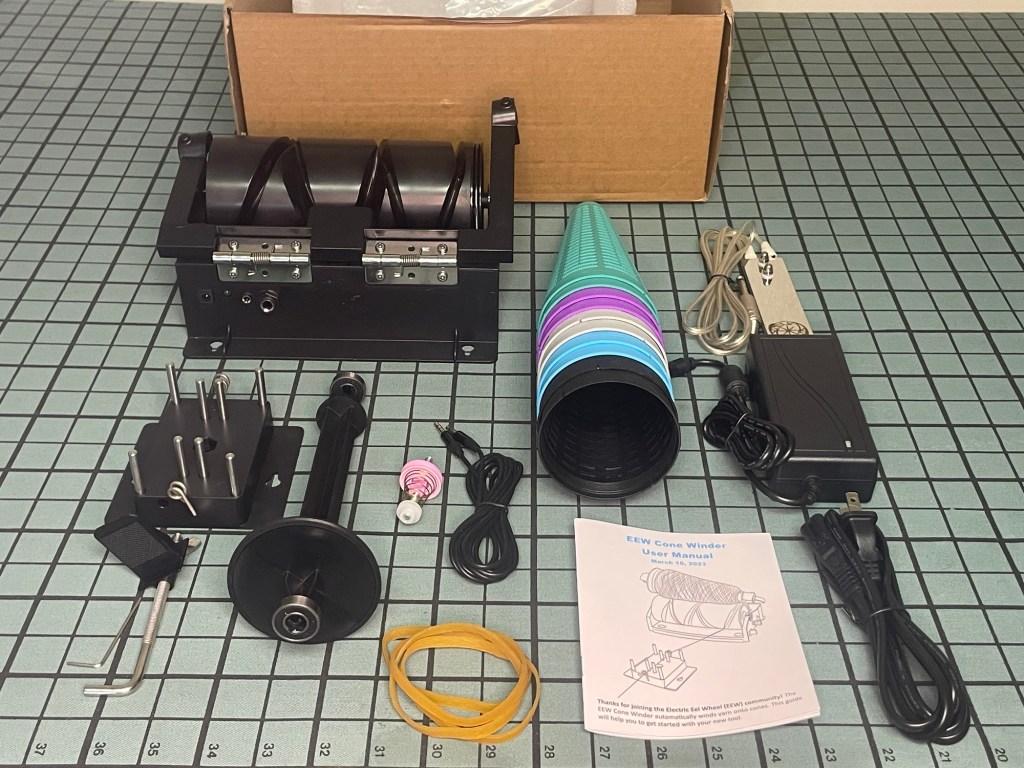
The EEW Cone Winder- Unboxing and Initial Thoughts

If you’re familiar with the Electric Eel Spinning Wheel, you might know that Maurice Ribble of Dreaming Robots, the mind behind the magic, recently released an electric cone winder

I backed the project on Kickstarter in 2022. I have only backed three or four Kickstarter projects, but I have to say, Dreaming Robots was great about keeping backers in the know about the state of the project and allowing input. I forgot to fill out the address form when it came out, so my winder arrived in December, but that’s all on me! (Facepalm) I paid the Kickstarter backer price of $189 plus shipping. The cone winder now retails at $259 and is in stock as of the time of writing.

each block is ~1 inch for size reference

The winder was packaged securely and nothing was damaged in shipping. I opted for 10 cones with my winder.

The manual is straightforward and comes with a template to show you how to lay out the tension unit and winder unit. I love that. I’m not great at eyeing measurements, and even though my blocking board lays things out by square inches, I can still measure things incorrectly. It’s a skill.

The cones are 27 grams according to my scale, and I like that they come in different colors. It’s fun. They look pretty cool on the inside once they hold yarn, too.

Assembly was straightforward and well laid out in the manual. There are excellent videos and written instructions on how to use the EEW Cone Winder on the Kickstarter page and FAQs on the product page. I avoided watching anything or reading anything but the initial Kickstarter campaign and the user manual before testing the winder for this post.


Initial Test-Winding Yarn from a Hank

I decided to cone up some of my friend Suzy’s yarn, Woolyboogers Felts. She works out of a studio next door to Get Stitchin’ and exclusively sells at craft shows and Get Stitchin’, so she’s just another great reason to stop by if you’re in the Tulsa area.
(You can sign up for one of my classes while you’re there! Standing classes the 2nd and 4th Wednesdays and Saturdays of the month!)

I used knitting machine clamps and the included tension unit clamp to hold the units in place on my counter, and I initially had my yarn swift (this thing) on the counter next to the winder. That meant the yarn was coming down from the swift to the counter level tension unit.

Using speeds 1 and 2 with the loosest, straight tension setting, I wound the 438 yards of sparkly goodness onto the cone. Well, the winder did all of the work. I supervised.

“professional” placement! haha

On the lowest settings and loosest tension, it took a few minutes to wind, but I wanted to be cautious learning the winder. I had a couple of issues with feeding into the tension unit from the swift when I had it sitting so much higher than the tension unit intake. It worked much better when I moved the swift to sit on a chair and the yarn intake was more level with the tension unit as it fed yarn in. The yarn winder had plenty of power to wind from the swift, but I found on the lowest tension it had to work a bit harder if the hank on the swift was held too tightly or the yarn was caught underneath itself.


After the slow speed test run with Woolyboogers, I decided to cone up four skeins of Berroco Modern Cotton DK. (I’ll be reviewing it soon, so be on the lookout for that post in the future!) 

warm light | cool light

I wound each skein at a higher speed than the last, with the final at speed setting #5. I was catching a breeze from the swift at that point! I used the higher tension winding setup as shown in the manual for this yarn. 

It looks great coned up! The cone has two small holes at the top for you to attach the yarn label and then store in the center of the cone.

I prefer a more tightly wound cone of yarn, especially for fibers like cotton. The looser tension setting is probably more ideal for delicate yarns. I didn’t experience any yarn breakage, and I did “jam” the winder a couple times. More on that in a bit.


Turn up your audio to hear what the EEW Cone Winder sounds like at speed #5 in my Instagram video below. My pictured setup isn’t ideal, but what I had worked just fine!

I wouldn’t say the cone winder is loud, but it definitely isn’t silent. You can hear it working rhythmically, but I didn’t find it unpleasant. 

If you’ve wound a lot of yarn into cakes before, you’ll appreciate the electric cone winder doing the hard work for you. Your arms can get tired after a thousand yards, but with the winder, you’re just turning a dial after a little yarn threading. Easy peasy!


Experimenting and User Error

Ah, the aforementioned jam.

The only issues I ran into using the electric cone winder stemmed from user error and experimentation with yarn swift placement for intake through the tension unit.

At one point, I was pulling additional yarn lengths from the swift because the winder seemed to struggle with pulling directly from the swift.

I shouldn’t have been pulling additional yarn out. The winder didn’t need my help. It operated fine, albeit slowly, when I stopped feeding it yarn myself at low settings as well as after I increased the speed dial setting.

While I was pulling that additional yarn from the swift, knots and loops developed in the yarn and happened to hook themselves around the metal guide spiral. The winder kept going for a tiny bit (of course, it is set to ON and rotating) BUT then it stopped.

When I read the FAQs on the product page, I found the motor stopping is by design, and I appreciate that it stopped and didn’t break my yarn!

This is by design. It is bad for the motor to continue trying to spin when it is not spinning. At low power this can happen when it’s trying to spin slowly but there isn’t enough motor to actually spin the drum. In this case the motor will turn itself off until it sees no attempts to spin for 3 seconds. To work around this turn the speed dial to off and then wait three seconds and it will resume normal operations.

from the FAQs at https://www.dreamingrobots.com/eew-cone-winder/

This is one of the reasons why you don’t set the winder and leave it. If something happens, that delay gives you time to fix things.

I’ll say it again: winder does have enough power to be able to pull yarn off of a swift through the tensioner unit, but at low speed settings with looser tension it seemed more likely to knot up or loop around the metal guide spirals on the tension unit, especially if the yarn wasn’t feeding in quite even with the tension unit (that pesky user messing with it…). It may seem counterintuitive, but I didn’t experience the same looping when I upped the tension and the winder speed (and left well enough alone). Pulling extra yarn from the swift to feed into the tension unit just gave the yarn opportunities to form knots and loops and catch on the tensioner.

Yarn placement is important, and getting it right makes your experience with the cone winder much smoother.


Why Buy a Cone Winder

As someone with hand and arm issues, I am so excited to have a way to wind that doesn’t depend on my arms functioning well that day. And, since cones are the most ideal yarn put-up for machine knitting, I can say goodbye to my awkward cake yarn winder. It served me well, but I’m happy to move on, and I won’t miss the occasional loops across the top and bottom that sent my yarn rolling.

At $259, the electric eel cone winder is not cheap. That’s a chunk of change for anyone, but if you want to use hand knitting yarns by machine and your ball winder isn’t cutting it, I think it’s worth the investment, especially if you have years of knitting in front of you, or if you are like me and have issues with your hands, wrists, and arms in general. Cutting out the winding motion lets me use my body’s limited energy to work on actual knitting.

All opinions are honest and my own. Purchases are made with my own money. Links may be affiliate links. If you choose to purchase something using my Amazon affiliate link, I may earn a small commission at no cost to you. If you don’t have somewhere local to purchase your machine knitting needs, please consider using my links to support the site! 

Thank you for joining me on my machine knitting journey! How do you prepare your yarn for machine knitting? Will you invest in a cone winder? Let me know in the comments! 

Accessories, Knitting Machines

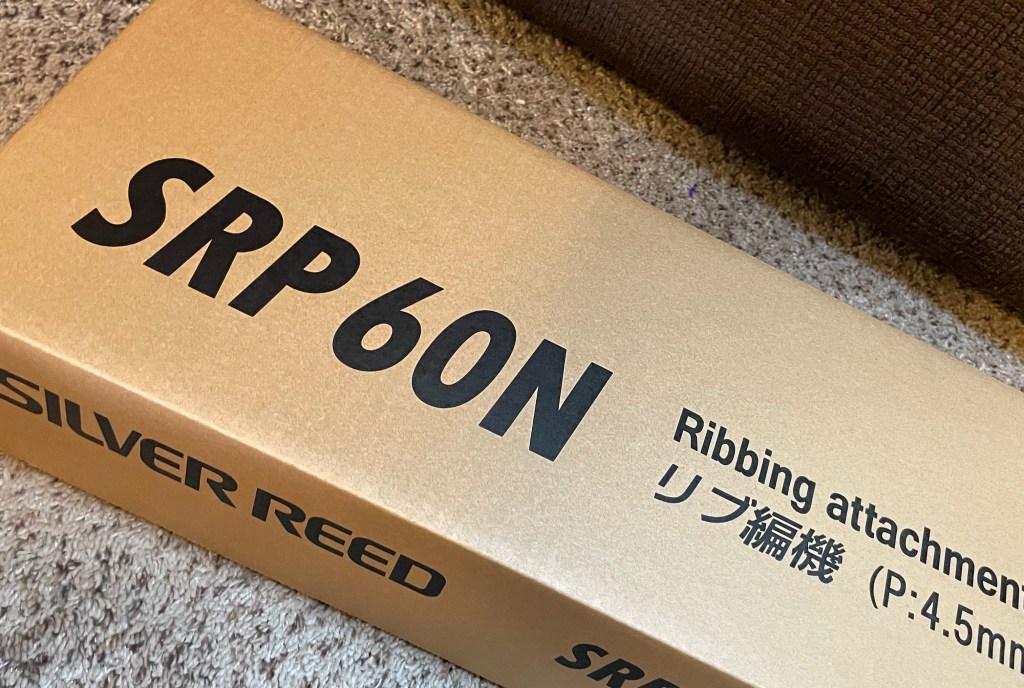
Silver Reed SRP 60N Ribber Attachment Unboxing and Assembly

Last time, we unboxed and assembled the Silver Reed SK 840 standard gauge 4.5mm knitting machine. Now it’s time to learn what comes standard with the Silver Reed SRP60N 4.5mm ribbing attachment, often referred to as a ribber bed or simply a ribber.

Let’s see just how adding a second needle bed expands your machine knitting repertoire!


Compatibility

The Silver Reed SK 840 standard 4.5mm gauge knitting machine is the only current model the SRP60N bed fits. The SRP60N will not knit on its own and must be used with a main bed.

This attachment also fits older, discontinued models SK 210, SK 500, SK 580, SK 700, and SK 740. These could be labeled with Singer, Studio, Knitmaster, or Empisal brands, which were also produced by Silver Reed. This bed works with both punchcard and electronic machines.


Unboxing

Just like the main bed, the SRP60N ribbing attachment is securely packed in a shipping box and another box contains the actual ribber bed unit. The attachment and its accessories weigh in at around 30 pounds.


“helping” with accessories

The accessories come in a long, specially molded styrofoam block that slides in over the needle bed.

The styrofoam holds ribber-specific cast-on combs, a needle pusher, punch cards, a handle, a plating guide, and weights.

Instead of claw weights, the weights are cylindrical with a hook at the top. The smaller weigh about half a pound, and the larger weigh about a pound.

Mind your feet with these weights! It does NOT feel good if one falls on your bare feet!
(Learn from me and wear shoes when you machine knit.)


Be careful with this part of the unit!

The ends of the needle bed are held up with the help of two more molded styrofoam pieces and a flat spacer. These keep the back of the ribber bed safe during shipping and storage.

Each back side of the bed hosts a joiner point where the ribber slides into the main bed. These can be easily bent and damaged if the ribber bed rests on them, so the bed is packed needle-side down.

The ribber is not built into its own carrying case like the main bed and needs to be stored in a way that does not damage the attachment plates on the back, so I strongly recommend keeping the box and foam it came in.

If you uninstall the ribber from the main bed for transport or storage, put it back in the box with its special foam pieces, even if it’s temporary. Otherwise, gently place it needle side down in an out of the way place, or needle side up on a chair and allow the attachment points to hang down without touching anything.


auxiliary pieces to the main bed

Important note: the SRP60N comes with two “auxiliary pieces” that screw into the main bed on each side front that are required to attach to the main bed. The ribber will not fit properly unless you install these, so don’t lose them!


What does adding a ribber let you do?

Ribbed Stitches

As you’ve probably guessed by its name, the SRP60N ribber bed allows you to knit rib stitch patterns without manually reforming the stitches with a latch hook tool. If you knit ribbed edgings often, this attachment will save you a lot of time.

The main bed (the SK 840, sold separately) creates knit stitches while the ribber bed (the SRP60N) creates purls. You can use needles from each bed in combination to create simple rib stitch patterns like 1×1 or 2×2 ribbing, but that’s just the beginning.

Using punch cards or design software like Design A Knit 9, you can create special stitch combinations for endless fabric design opportunities. New combinations include tuck stitch ribbing and fisherman’s rib (think brioche, hand knitters! That’s actually a type of tuck stitch), as well as lace, cables with defining purl stitch patterns, and a special type of colorwork called double bed jacquard.

Circular Knitting

One bed means everything is made flat, but two beds means a tube!

Because the SRP60N has 200 needles just like the main bed, circular knitting with up to 400 stitches is possible simply by adding a ribber.

One round of knitting will take two passes of the carriage—one pass for the main bed and one pass for the ribber bed.

I love being able to knit in the round on my flatbed machines. Socks are my current circular knitted favorite, but you’re not limited to small items like you are with circular sock knitting machines that generally have around 70 stitches. Remember, you have 400 needles now!


Assembly

“Read the manual!” sounds like a cop-out on an unboxing and assembly post, but the manual should always be your first stop, especially if you are installing the ribber on a different model than the SK 840 I’m using.

There are diagrams, instructions, part names, and troubleshooting sections.

If you lose your manual, you can download a PDF copy at Machine Knitting Etc.

Table or Stand

Whatever you use to set up your machine needs to be able to withstand some torque. I prefer using a metal tilt/A-frame stand when I work with two machine beds since I don’t have a sturdy table that fits the clamps.


The first step in installing your ribber is to take down the main bed.

Take the tension unit out and set it aside.

The ribber needs to sit at a specific angle on the table/stand for the beds to knit properly, so taller, angled clamps are included with the attachment.

left: ready to install
right: installed

Remove the main bed’s original clamps and install the clamps that came with the ribber. Make sure the clamp slides to the smaller side of the hole and securely tighten it. Reattach the main bed to your table/stand.

Screw the auxiliary pieces (pictured earlier in the unboxing and seen in use below right) into the main bed and then insert the ribber attachment points into the slot of the auxiliary pieces. Secure the ribber to the table/stand with the main bed’s clamps.

left: angled clamp securing main bed
right: original main bed clamp securing ribber bed

Stand users: Your stand may have come with a part that sits around and under the tall clamps (as seen above on the left). This piece did not come with the ribber. I personally haven’t noticed a difference in stability between using it and leaving it out, so don’t worry too much if your stand doesn’t have one.


In addition to four clamps, the needle beds are further stabilized with ribber join supports. You simply flip the pieces up so they touch the main bed.


top: aligned
bottom: offset

The centers of the main bed and ribber bed are each marked with a zero. The alignment of the beds is adjustable depending on which type of knitting you want to do, but when you’re setting things up, you generally want the zeroes to align and then adjust from there according to the manual.

The ribber can be lowered so you can knit using only the main bed without uninstalling the ribber, but it must be fully raised to perform its functions.


The ribber has its own carriage that slides across the needle bed and has a special attachment for the main carriage called the ribber arm. You must use the ribber arm in the main carriage for ribber functions.

To install the ribber arm, remove the main carriage sinker plate by unscrewing the knobs and sliding it out. Put it away in the main bed’s lid. Slide the ribber arm in place where the sinker plate was, and tighten the knobs.

Do not over-tighten. You could strip the knobs. Hand tight is enough to securely hold the ribber plate.

The ribber carriage slides on to the tube-like railing at the bottom of the ribber needle bed. It leans toward you when you install it, but it must be flush with the ribber bed to use. Simply push it toward the needle bed to achieve this.

The main carriage and ribber carriage work in tandem and must be attached to properly function. The ribber carriage will click into place under the main carriage as you slide it along the bed. The two carriages can now move as a unit to knit.

The final step is replacing the tension unit. The tension rod has a bend at the bottom that bends away for use with the main bed alone but needs to bend towards you when the ribber is attached. This puts the rest of the tension unit pieces backwards, so you need to flip them around on the rod.

And there you have it! The Silver Reed SK 840 with the SRP 60N attachment, all set up and waiting for yarn!


If you’re interested in purchasing current Silver Reed knitting machines or accessories, please contact me. I sell Silver Reed knitting machines through Get Stitchin’ in Tulsa, Oklahoma. We’re happy to custom order current Silver Reed machines and parts for you, and we keep the Silver Reed LK 150 plastic hobby machine in stock. Please be aware that we are experiencing some delays in delivery due to supply chain issues like everyone else, but we will keep you informed each step of the way.

And stay tuned! More accessory unboxings and demos are coming to help you learn what each machine can do and what add-ons you might want or need for your favorite stitches.


Thanks for reading! I hope you enjoyed this look at everything that comes standard with the Silver Reed SRP60N ribbing attachment that fits the SK 840 standard gauge metal bed knitting machine.

Did I miss anything? What would you like to see next? Let me know in the comments below!

Accessories, Patterns

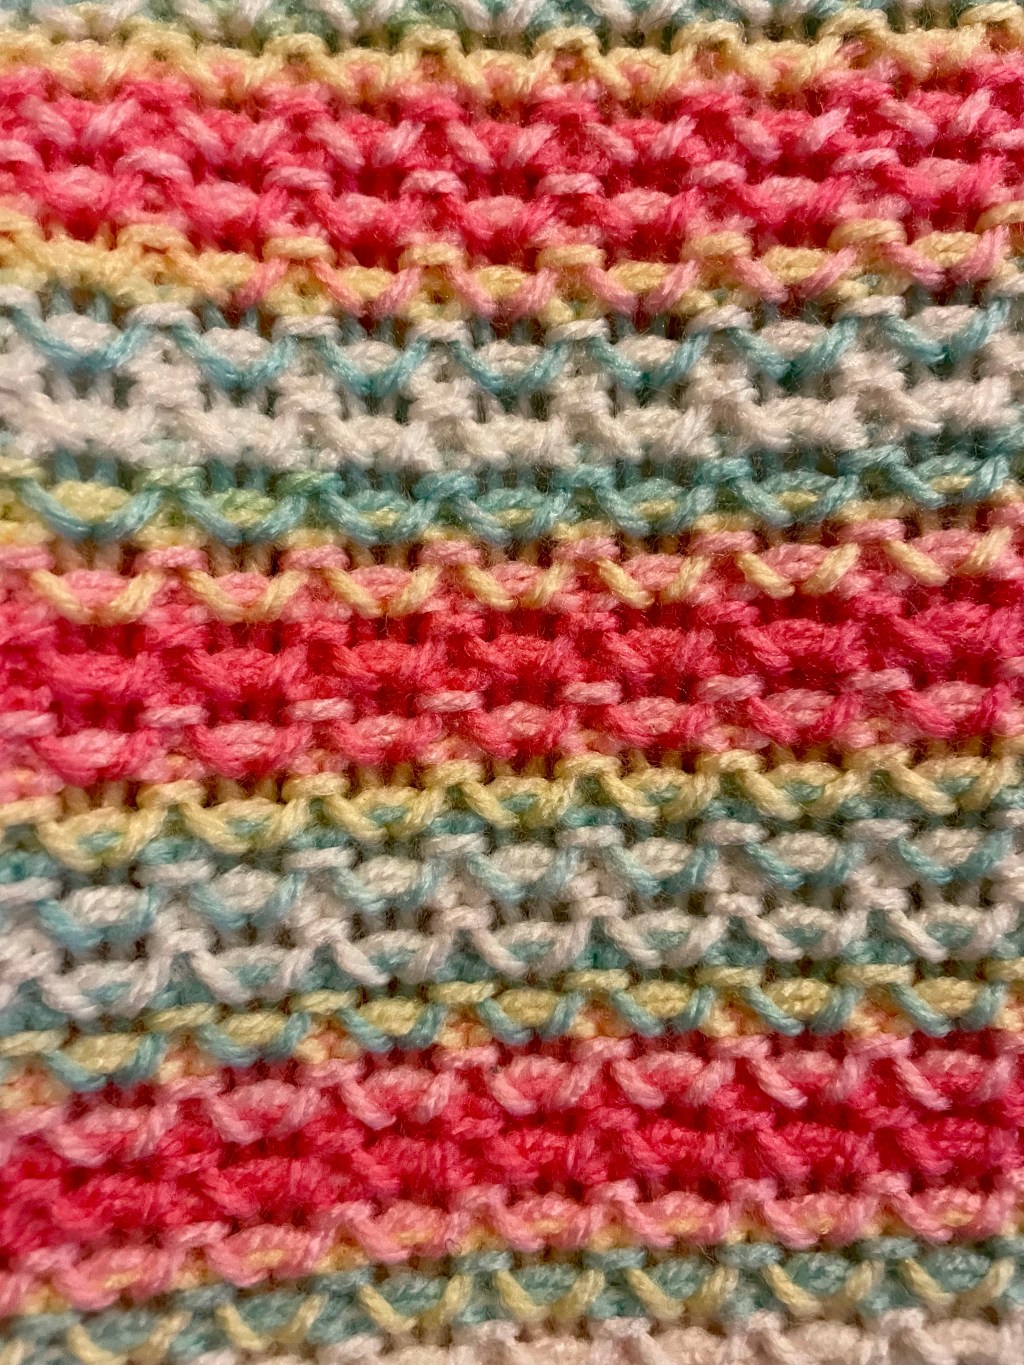
Using The Needle Beetle with Bonus Baby Blanket Recipe

If you have a 6.5mm mid-gauge SilverReed LK-150 knitting machine, this accessory is a must-have!

The Needle Beetle Needle Selector by KrisKrafter makes knitting patterned stitches a breeze. Instead of selecting the whole bed of needles by hand or using a needle pusher,

You hand select the first 8 needles into the arrangement you want, then push the Needle Beetle across the needle bed and it will select the rest of the needles lickety split!

KrisKrafter Needle Beetle

I wanted to knit a full bed tuck stitch baby blanket on my SilverReed LK-150 to go along with my Lion Brand Ice Cream yarn review, but I didn’t want to select every other stitch for two out of three rows using only my needle pusher or my hands.

I can be a patient knitter if I try hard enough, but selecting stitches like that is not my idea of a good time.

Needle Beetle to the rescue!

After finding where I had safely stored it after purchasing it in January (I really need to stop rearranging my craft room), I took it for a test knit.

I love tuck stitch patterns, so the majority of my Needle Beetle usage so far has been tuck stitch work.

front and back of a Nancy Marchant tuck stitch done on the LK-150 using the Needle Beetle in mystery yarn

Since I have a standard gauge punch card knitting machine, I don’t normally do much patterning on my LK-150. I’ll do a bit of cabling or hand-selected lace, but tuck or fair isle? Nah. Why do that on the Lk-150 when I can have my standard machine do it for me?

But talk about fun! I really was missing out on the things the LK-150 can do by ignoring patterned stitches just because I’d have to select by hand or needle pusher.

For the time it saves and the versatility it reminds you the LK-150 already has built in, the Needle Beetle is an amazing and worthwhile addition to your accessory collection.

And for those for those stubborn (ok, I’ll admit it, for me the word is lazy) knitters, you can’t go wrong with the time it will save you for only $89.00.


Troubleshooting User Errors

The Needle Beetle comes with very clear instructions, so I feel like the issues I had with it were entirely my fault.

1. Loose Screw

The Needle Beetle isn’t just for the LK-150 machine. It also works on the LK-140, the GK-370, and the 9mm LK-100/Zippy 90 models. For the KX-350/355/360 machines, KrisKrafter offers the Needle Beetle II, which performs the same as the Needle Beetle but fits those machines.

Since it fits both 6.5mm machine and 9mm machines, the cam inside the Needle Beetle is reversible. You simply flip it over and screw it back in. Since I like seeing how things work, I took mine apart to look at all of the pieces and see how they fit together.

The instructions warn of over-tightening the screw on the cam, but I think I took the warning a little too seriously. At the end of selecting a row of needles, when I picked up the Needle Beetle, the cam, flipper, and other parts kept going!

I ended up having to search my craft room floor for the screw, washer, and cam. And of course my mischievous cat was batting one of the pieces around. (I promise I love her, but she’s about to be barred from the craft room for eternity.)

So do tighten the screw. Don’t over-tighten it. But don’t under-tighten it, either. If it isn’t secure, the motion of the cam selecting the needles will vibrate the screw out of its hole and send you on a quest to find the pieces of this magical accessory.

2. Wrong Track

If you aren’t paying attention and you align your Needle Beetle along the carriage track rather than the track containing the needles, instead of selecting needles from upper working position, it will take out of work needles and push them into work.

Whoopsies!

3. Position Label Sticker

If your LK-150 still has the sticker labeling working positions A, B, C, and D on the right side of the needle bed, you might want to be careful with how you push the Needle Beetle across your machine.

I wasn’t careful, and the Needle Beetle picked up part of the edges of my sticker and eventually took the sticker with it. I don’t need the sticker, so it isn’t a big deal, but if you’d like both ends of your machine bed to look the same, be careful with how you put pressure on the Needle Beetle if you’re using it for full bed patterning and it might come into contact with your position label sticker.


Bonus: Tuck Stitch Baby Blanket Recipe

This tuck stitch baby blanket is a great way to put your Needle Beetle to work!

For this blanket, cast on an odd number of stitches using scrap yarn and ravel cord.

I used 149, nearly the whole bed.

I knitted one row plain and then began my tuck stitch pattern.

This pattern is based off a variation of one of Nancy Marchant’s hand knitting two-color tuck stitches, which I find a bit funny since Marchant herself has mentioned that she once used tuck stitches in machine knitting and developed many of her hand-knitted tuck patterns inspired by machine knitted tuck. We’ve come full circle!

Instead of switching out yarns, I decided to use the multicolor Lion Brand Ice Cream Big Scoop from my earlier yarn review. The yarn is a decent acrylic with fun colors that are perfect for a baby blanket.

Select every second needle of the first eight stitches. Slide the Needle Beetle across the bed to continue the pattern. Every other stitch should be all the way towards you in HOLD position.

** The first and last stitches should not be in hold. They should remain in working position so they are not tucked.

Set Carriage to HOLD.

Knit three rows.

Set Carriage to NORMAL.

Knit one row.

Repeat these four rows until your blanket is your desired size, ending with a plain knit row.

Scrap off or place all needles in HOLD to add edging to live stitches.

I used the “worm” (also called pie crust) edging with six rows knitted on three live stitches before moving to the next three stitches. I skipped rows in between “worms” on the sides of the blanket to mimic the look of the worm edging on live stitches.

Diana Sullivan on YouTube has great edging ideas, so you should definitely go check her out for great how-to videos for edgings.


All opinions are honest and my own. I am not affiliated with any company or individual mentioned or linked unless otherwise noted. I purchased this accessory myself and did not receive compensation for this review.


Do you have a Needle Beetle Needle Selector? What projects have you knitted with it? How do you like it!

Let me know in the comments below!

As always, thank you for coming on this machine knitting journey with me.