Knitting Machines, resources

Resource Roundup- YouTube Edition

Do you have a favorite machine knitting YouTuber? You will after this post!

Each channel name links to the channel, so check them out!


Anna Haferman

Anna has a tutorial about using a KnitLeader with the LK 150! How awesome is that?

She also has project videos with really clever ways to work fair isle among other things. I’ve been watching her channel a lot lately, and she might be my favorite machine knitting YouTuber!


Diana Sullivan

Diana’s channel features beginner lessons along with cast-on, cast-off, and edging videos.

This pinwheel baby blanket was one of my very first machine knitting projects. (Her channel doesn’t allow embedding videos, so there won’t be a preview for this one.)


Creative Tien

Creative Tien features machine knitting, crochet, and sewing tutorials. I found the channel very recently but have really been enjoying it.

I really like the scalloped edges from this video:


Knitology 1×1

Channel owner Elena works in London as a knitted textiles designer and shares stitch and project tutorials.

The braided cable in this tutorial makes a lovely tank top strap that I can’t wait to try:


Claire Newberry

Although she only has a few videos, they’re worth the watch. Plus, she wears gorgeous sweaters as she films!

I particularly enjoyed her bead knitting video. The swatches she displays at the beginning are gorgeous!


Carole’s Country Knits at Rocking Horse Farm

I believe they might be more active on Instagram, but the Rocking Horse Farm channel is still worth a visit!

My brain isn’t quite happy with the 90 degree rotation from flatbed to circular sock machine, so this short rowing video has been helpful:


The Answer Lady

You may know the channel from the Ask Jack machine maintenance videos, but channel also includes pattern tutorials, tips, and tricks. I’ve seen Circular Sock Machine tutorials recently, too!


The Knitting School Online

TKSO offers more classes on their website than their channel, but you can get a good idea about their paid content through their YouTube content.

This double bed jacquard video made me excited to try out my color changer attachment.


Roberta Rose Meads (previously Roberta Rose Kelly)

Some videos may be “old” by YouTube standards, but the channel is a wealth of knowledge.

I’m obsessed with short rows, so learning you can do intarsia using short rows was amazing! Check it out:


Susan Guagliumi

In addition to her books, Susan Guagliumi has Craftsy videos! Not all of them are on uploaded to YouTube, but if you’re looking to see if her Craftsy content is worth it, and I’ve had many people tell me it definitely is, check out her channel!


Knit It NOW

Sue at Knit It NOW has a wonderful website with a yearly subscription that she introduces on her channel. You can have a free membership with access to some of her content on her website, but YouTube is still a good way to browse some of what you can find at her main site. (Her channel doesn’t allow embedding videos, so there won’t be a preview for this one.)


While in-person learning will always be my learning preference, I love finding new machine knitting video resources!

Who am I missing? I’d love to watch your favorite machine knitting YouTubers.

Thanks for tagging along with me on my machine knitting journey!

News

February Happenings

Wow! January flew by! I hope you all are staying warm and well.


Winter Knit-A-Long Continues

Don’t worry if you missed any meetings in January!

If you’d like to join us in knitting the Festival of Stitches by Lisa Hannes, please do! This is a very casual KAL focused on knitting fellowship as we all finally take time to make something for ourselves.

Every Wednesday from 12:00PM to 4:00PM we’ll be at Get Stitchin’ working on this beautiful wrap.

I’ve had a wonderful time making new friends and chatting with old friends. I hope you’ll join us if you’re in the Tulsa area!


Important Date Change–Machine Knitting Spring Seminar

Originally scheduled for April 8, 2023, our Spring Machine Knitting Seminar is now APRIL 1, 2023 from 10AM-4PM.

Someone, not naming names, (EMILY), used Orthodox Easter to schedule the week before Easter. (I learned something, though. That’s good, right?)

Joking aside, I apologize for any inconvenience this scheduling change might cause. I hope that we have changed things early enough for anyone who has already planned their trip to Tulsa to reschedule without issues.

Again, the Spring Machine Knitting Seminar is April 1 from 10:00AM to 4:00PM.

Visit the Event Page on Get Stitchin’s website to sign up.

Pamela Carrico of CMO Designer Knits returns to share over 40 years of machine knitting experience with us.

We will be learning to make a body block and designing a custom fit sweater from that body block!


Eureka! Fiber in the Ozarks

March 16-18, 2023
Eureka Springs Community Center

Find some ELY Knits handmade goodies among others from the Get Stitchin’ crew at the Eureka! Fiber in the Ozarks festival in Eureka Springs, Arkansas.

Visit the festival’s website to learn more.


Sock Club is coming in March!

There’s more fun coming to Get Stitchin’! Sock Club is starting up in March and will run all year through November. Every 2nd and 4th Saturday of the month from 10:30AM-12:00PM I’ll be going over the Sock of the Month.

If you prefer weekdays, Ms. Terry has a weekday meetup every 2nd and 4th Tuesday.

This is not a class, so you will need to have some experience already, but Ms. Terry and I will be around to help you troubleshoot. This will be a great opportunity for newer sock knitters and veterans alike as we explore heels, construction methods, and new sock yarns.


As always, you can check out my Google Calendar for standing classes, events, and shows.


Class booking and availability will be according to Get Stitchin’s website, so be sure to check their Classes page.


If you would like to book a lesson that is sold out or is not on the schedule, please contact me and we will find a date and time that work for you.


Patterns

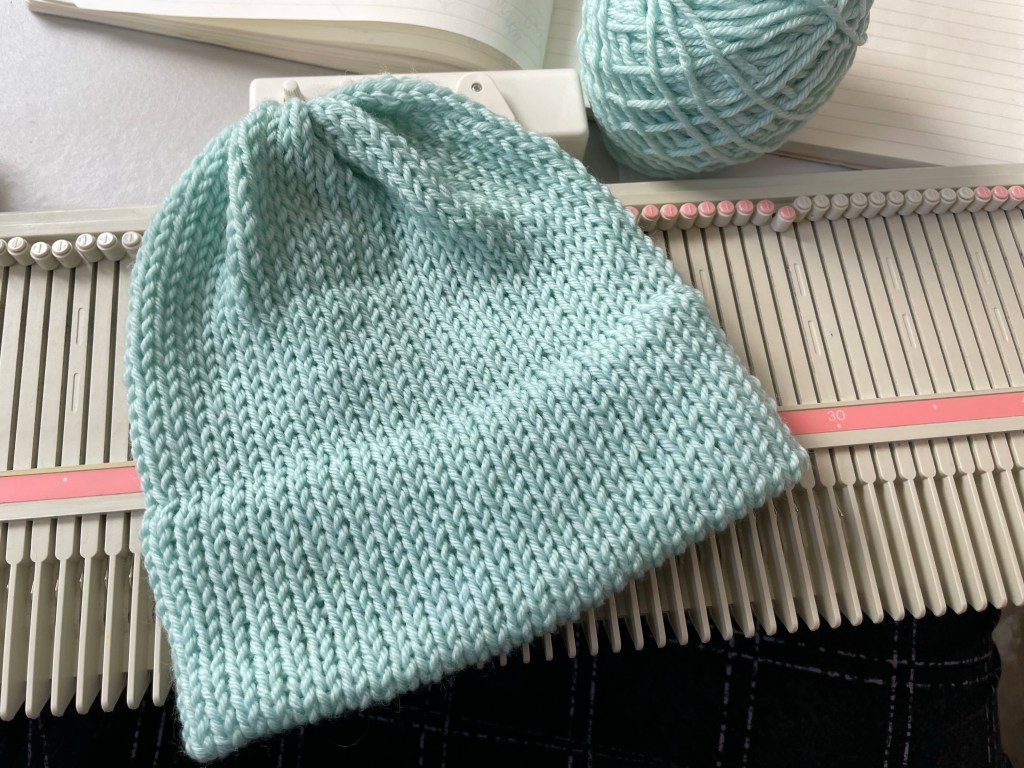
The Doodle Beanie — Free Machine Knitting Pattern

I was playing around on my Silver Reed LK150 a while back and came up with this simple beanie that begs to be customized. This hat has a folded brim and a cinched crown that would look great with an added pompom.

It’s just a rectangle, but it’s the perfect template to doodle around with and try out new things as you develop your machine knitting arsenal of techniques. I hope you enjoy it and put your own spin on it!


Materials

50-150g of Worsted Weight Yarn (Samples use Cascade 220 Superwash Wool at T7)
Silver Reed LK 150 6.5mm knitting machine

Sizing

Baby- 60 stitches, 30L-30R
Child/Teen- 80 stitches, 40L-40R
Adult- 90 stitches, 45L-45R
Adult L- 100 stitches, 50L-50R

Gauge

4 st per in at T7 in Cascade 220 Superwash


The Doodle Beanie concept will work with any machine gauge and suitable yarn. Knowing your stitches per inch from swatching yarn is immensely beneficial, so I encourage you to swatch beforehand if you have no clue what yarns knit best at what tensions on your machine. 


Pattern Instructions 

Set Tension to 7.
E-wrap CO 60 (80, 90, 100) stitches.

Brim:
Knit 20 (30, 40, 40) rows.
Hang hem by picking up the e-wrap and hanging it on the needle above it. 
Knit 1 row at T9. 

Revert back to T7.
Reset to RC000

Body:
This is the place to experiment with stitch patterns, stripes, etc
Knit 20 (30, 40, 40) rows.

Crown: 
Transfer stitches to EON.

Tension down to T6. Knit 1 row.
T5. Knit 1 row. 
T4. Knit 1 row.
T3. Knit 1 row.


Finishing:
Do not remove stitches from needles. 
Leaving a tail long enough to seam the beanie, cut yarn. 
Thread needle and sew through the live stitches from the opposite side of the tail before removing the beanie from the machine. 
Cinch the top of the beanie together. 
Pull tightly but be careful not to break your yarn. 

Mattress stitch the sides of the beanie together. Weave in ends. Attach a pompom if you like. 


Modification Tips and Ideas

For a rolled brim, halve the number of rows in the brim step and do not hang the stitches.  

If you are not comfortable using your transfer tools or are in need of a very quick knit, tensioning down alone will work, but you will need to cinch the top together above the remaining live stitches like the pictures below to close the crown. The density of stitches at the crown is why we decrease to EON.


If you want a bit of a slouchy beanie, you can add 5 rows and skip tightening tension in the crown altogether. It will be easier to cinch the top if you decrease to EON.

Try knitting two strands of smaller yarns together or using variegated yarn to spice up the simplest version of this hat. 


Abbreviations

COCast On
BOBind Off
WPWorking Position
CORCarriage on Right
COLCarriage on Left
EONEvery Other Needle
RC ###Row Count ###, i.e. Row Count 023
T#Tension and size number (Tension 1, Tension 2…)

What will you doodle?


Did you knit a Doodle Hat? Please consider sharing your projects on ravelry so I can see what you made. I love seeing project pictures!

If you’d like to help support the site, please consider buying me a Ko-Fi.

As always, thank you for joining me on my machine knitting journey! Let me know what you think below in the comments. I’m also happy to hear from you via my contact form or on Instagram.

resources

Looking for Machine Knitting Media? Pin it!

Sometimes you just want to scroll the internet and see what others are doing with their knitting machines. You might use Facebook groups or your Instagram feed, but what about Pinterest?

I’ve used Pinterest since it began in 2010. I planned my wedding by making mood boards and plotted out interior designs for our first house. Now I use it for nail art inspiration, bullet journaling spreads, hair styling tips, and yes, machine knitting.

Pinterest’s machine knitting recommendations for me

I’ve been making stockings lately, so I searched Pinterest for punchcard patterns.

search results for machine knitting punchcards

Not bad! But I should’ve specified “Christmas punchcards”….

Sometimes Pinterest gets hand knitting, machine knitting, crocheting, and other yarn crafts confused, but that’s okay!

They’re at least knitting charts!

Don’t be upset if your search brings up hand knitting or even cross stitch charts! Remember that you can hand transfer lots of lace patterns and hand select colorwork patterns, so even if a chart wasn’t originally meant for the knitting machine, you can still put it to good use!


You can check out my Machine Knitting board on Pinterest here and follow it if you want.

my machine knitting board

What sites do you use to find machine knitting inspiration or patterns? I’m always on the lookout for new inspiration!

Knitting Machines, News, Seminar

Spring Machine Knitting Seminar

It’s been a while, everyone!

I hope you’ve been doing well!

If you follow me on Instagram (@ely.knits), you’ll know that I recently hosted my first machine knitting seminar in Tulsa at Get Stitchin’!

“Fit, Fabric, and Finishing” was our theme on October 15. Pamela Carrico of CMO Designer Knits showed us ways to tailor knits to be truly custom, well-finished items and reminded us that we make fabric and can make so much more than just sweaters on our machines.*

Things went so well that we decided to schedule the Spring Seminar already!

**Important Date Change!**

Updated February 2023

Join us Saturday, April 1, 2023 from 10AM-4PM for a machine knitting seminar featuring Oklahoma’s own fiber artist Pamela Carrico!

Pamela has over 44 years of experience in fiber arts and creates one-of-a-kind handmade pieces that have traveled the world. 

The spring machine knitting seminar is brought to you and sponsored by ELY Knits. (Me!)

Click the date above or this link to go to Get Stitchin’s website and sign up! We’ll be teasing out more info as we get closer to seminar, so stay tuned!

First sneak peek:

Do you know what a body block is?

*If you missed it and would like to purchase a copy of the patterns we learned, check Pamela’s Etsy store, where PDF downloads will be available for purchase soon.

If you were wondering where in the world I’ve been and why there haven’t been any posts in ages, here’s the personal stuff:

We moved!

Before, I had the smallest bedroom in the house stuffed full of my knitting, but now we’re on an acreage and I HAVE A STUDIO! I’m so excited!!

It’s still a huge mess even though it’s been six plus months since we moved… but things are beginning to shape up.

I have shelving for my vintage magazine and book collection and a wall of pegboard for my cones and hanks. My to-be-cleaned-and-restored machines have their own shelf in a workroom so I can keep any chemicals separate from the yarn.

It still seems unreal to have a studio, but I have one with two rooms now! And running water! (If this place had a bathroom I’d get a mini fridge and a cooking burner and just live here. Sorry husband…)

Eventually I’ll teach private lessons in the studio, but for now, I’m keeping things at Get Stitchin’ in Tulsa.


I’ve had two surgeries since the move, and recovery has taken a while.

One of the surgeries fixed a tendon issue in my thumb and wrist, but I still have numbness in my hand from the nerve being moved to reach the problem. That should continue to fade as time passes. (See this post for some background on my hands.)

While I’m pretty much recovered from my surgeries, I still have some specialists left to see for a more systemic health issue, so it may be a while before I return to my previous schedule. Even though I hate to, I don’t feel like I can 100% commit to regular posts yet.

But I will still do my best!


You can keep up with things I think are interesting but perhaps not blog post worthy on my Instagram @ely.knits.

Thanks for reading, and I’ll see you soon!

News

What a year!

Merry Christmas, Happy Holidays, and Happy New Year, everyone!

I hope you’re spending the end of the year how you want, where you want, with whomever you want.

From launching ELY Knits as a site to attending my first in person market in years, a lot of things have happened this year. I didn’t accomplish everything that I wanted to, but I was able to do some unexpected things like team up with a local store to become a machine dealer and team up with some local fiber artists to make some exciting projects for 2022.

I’m looking forward to next year. If you’d like to see specific techniques or yarns, as always, drop your suggestions in the comments below or send me a note through the contact page.

Thank you for taking time out of your busy schedule to join me on this machine knitting journey.

Good luck on your last minute knitting, and may you always win at yarn chicken.

hand knitting, Knitting Machines

Knitting with Hand and Wrist Pain: My Journey to Machine Knitting

This post includes my own experiences with pain and hand and machine knitting and should not be considered medical advice. If you have a concern about knitting-related pain, you should seek help from a medical professional.

More Common Than You Think

Over the years I spent working in a yarn shop, I heard a lot of things about customers knitting less or even stopping their hand-based yarn hobbies altogether because of hand pain.

Quite a few of our shop patrons experienced occasional or chronic hand pain, and their responses to it varied as much as their yarn projects.

Some customers swore off small yarns and began knitting with bulky yarns on large needles. Others blamed the bulk of large projects and decided to only work on small, lightweight pieces.

Some knitters swore by compression gloves to remedy their pain. Others relied on copper bracelets and rings to help with blood flow to their fingers. Some made lotions and balms with different oils to soothe and relax tired hands. One customer even suggested certain yoga poses to help release arm and hand tension.

Whether it’s arthritis, carpal tunnel, or tendinitis, knitting is a repetitive motion, so it does carry a bit of a risk of injury or aggravation with too much of it.

But what do you do when the pain gets to be too much and you can’t knit more than a row or two without stopping to rest or reaching for some medical pain relief?

If you’ve ever seen a knitting machine, you may think it could be the answer to keep you knitting.

Pushing a carriage across a needle bed to make a blanket or turning a crank to make a sock seems like such a simple motion compared to the steps you complete to make a stitch in hand knitting.

Knitting that quickly and simply must be super easy, right?


Life with Hand Pain

I’ve had issues with the joints in my hands and arms since I was a child. They gave me trouble with things from learning piano to writing class notes.

I learned to hand knit in college, but I didn’t ever knit long enough in one sitting to notice anything past the usual pain, swelling, and weakness flaring up, and it did that anyway with normal daily activity.

A doctor first noticed a bit of minor arthritis in one finger in my mid-20s, but she wasn’t able to pin down a reason for the rest of the weakness, inflammation, or swelling of my hands and arms.

She told me I should just stop knitting.

That advice came right as I was launching an Etsy shop and beginning to attend craft shows. It was a day ruiner, that’s for sure.

I loved knitting, and I wasn’t about to give it up, so I decided to follow the advice of my fellow knitters and tried stretches and compression gloves along with frequent breaks to alleviate my hand pain. If my hands were swollen and weak that day, I wore my braces and read knitting magazines or browsed ravelry instead.

I tried taking over the counter medicines and went back to the doctor again, but she still said there wasn’t anything wrong with me other than that small spot of arthritis. At this point, I was barely able to hold a pen or a fork, let alone knit.

I randomly saw a machine knitting video on Youtube. I don’t think I knew knitting machines existed before 2017, to be honest, but I finally started considering one a solution that could keep me knitting.


Hand Involvement in Machine Knitting

If you think machine knitting is only pushing a carriage across a needle bed, you’d be incorrect.

True, that is the most basic action in machine knitting, but you use your hands a lot.

If you have a manual machine like the SilverReed LK-150 or Brother KX 350 (click here to read a post about cleaning and testing this machine), you do everything besides knitting the stitches themselves by hand.

Needle selection is by hand. Transferring stitches for increases, decreases, lace, or cables is done by hand with specialized tools. Any decent cast on with a finished edge is done by hand wrapping or using the latch tool. Bind offs? By hand. Seaming? Unless you buy a linking machine, you’re doing it by hand.

And that’s the thing. It is quite easy to remove the majority of the hand manipulated element of machine knitting, but it isn’t cheap. You have to buy specific machines or accessories to lessen your manual involvement.

You can hand select and do things manually on all machines, but punchcard and electronic machines have settings that enable a lot less handwork. Those extra functions come with extra cost. They are more expensive, sometimes double the cost of the manual machines mentioned above, and some require buying even more accessories to accomplish what would otherwise be manual tasks.

Lace and intarsia specialty carriages can be over $100 each. Buying a second bed to knit ribbing can run about $500. Whether you buy used or new, you’re still looking at a range from a few hundred dollars to a couple thousand invested in removing the manual element from your knitting.


Adapting to Painful Hand Knitting with Machine Knitting

I still hand knit. It is what started me down the fiber road, after all. But I cannot knit as much as I used to. I’m down to about a tenth of what I once could do. Moving my hands in certain ways seems to flare things up more than others, so I’ve written off entire stitch patterns if they hurt.

It definitely feels awkward as an instructor to say I physically can’t do that knitting stitch other than showing how it’s done once or twice, but awkward is a better feeling than pain. I tell my students as long as they’re forming the stitches correctly, there’s not really a “wrong” way to knit. But if it hurts, that’s knitting the wrong way.

Some days I wake up and my hands feel fine. Others I can barely hold the spoon to eat my morning oatmeal. Checking how my hands are functioning is a part of my morning routine now.

I modified how I hand knit so that most of the motion comes from my better hand, my left. My right hand is basically a needle stabilizer. I can knit this way with braces on my hands, so I still get a little bit of hand knitting accomplished on painful days.

Moreso than trying to knit wearing my braces, I look for ways to blend hand my hand and machine knitting together. I figure out what parts I can hang on a machine so I can save my hands. Does the pattern call for 12″ of stockinette stitch? That’s going on the machine. Is there a complicated lace repeat on a hem? I’ll do that by hand with plenty of breaks on a good day or I’ll try to find a similar punchcard lace pattern on the machine.

I can operate almost every function of a punchcard machine on all but the worst pain days. I can push a machine carriage and change lever- and button-based settings; I can use transfer tools, the latch tool, and thread the machine’s tension unit. I’m not going to choose something with a lot of hand manipulation like cables or hand transferred lace on a bad pain day, but that’s easy enough to stay away from.


Return to Teaching

I had to pause teaching classes and working at the yarn shop when the pandemic started, and after the shop closed earlier this year, I was unsure if I’d teach hand knitting again.

I’m currently working with Get Stitchin’ in Tulsa, OK to offer classes and SilverReed machine sales through the shop. It’s a dream come true for me to be teaching again and connecting with the fiber community once more, but working around my hands sometimes feels iffy.

When you check the Classes page on Get Stitchin’s site, you’ll see hand knitting classes. With me. I’m not stopping, but I am adjusting.

I have to give myself much more time to compete a project. What would previously have taken me less than a month might now take three. Trying to have a sample done in time for in-store class advertising has been a little rough on my hands. Instead of the larger projects I once wanted to do with multiple-part classes, I’ve chosen smaller things that teach and reinforce skills and concepts but do it in a more compact project.


Worth It

Investing my time and money into knitting machines has enabled me to continue on my fiber journey. I didn’t have to give up my creative passion, and that alone makes machine knitting priceless to me. In addition, I’ve been able to speed up my design process because knitting a piece on the machine takes so much less time than doing it by hand. Making mistakes and ripping them out is not necessarily an uncommon occurrence for me when I’m working on the machine, but making those mistakes has given me more confidence in my ability to create and fix designs.

Knitting machines can’t always produce the exact same fabrics that hand knitting can, but there are analogs and even more stitch options to produce all kinds of wonderful fabrics that would be nearly impossible, or at the very least extremely impractical, to do with hand knitting.

I did manage to get some answers regarding my hands this year with a new doctor, but other than steroid shots, there’s not much that has been able to help. There are a couple surgical options in my future, but one always has to weigh risks and benefits with them. How long will I have to stop knitting to recover, and is it a permanent solution? I’m cautiously optimistic that I may finally be able to eat, write, and hand knit pain free someday.


Have you experienced yarncraft-related hand pain? What did you do to combat it? Did you turn to machine knitting to stay creative? Are you considering a knitting machine to give you more flexibility in your knitting? Let me know in the comments below, and, as always,

Thank you for coming on this knitting journey with me.

Knitting Machines

Cleaning a Brother KX 350 – Start to Finish

There aren’t really many entry level or hobby options for knitting machines in production these days. Your options are the SilverReed LK 150 6.5mm mid-gauge or … nothing. That’s it. The LK 150 is the only hobby plastic machine still in production.

The LK 150 is a great machine, and I love mine, but the $440.00 MSRP is a lot of money for something you might not be certain about.

BUT if you look to the used or vintage market, you might be surprised with what you can find.

The Brother KX 350 is another mid-gauge plastic bed hobby knitting machine. Many are still floating around in good condition. All they need is a little love, and they’ll be knitting for you for years.

The KX 350 was made in Japan and has 130 needles where the SilverReed LK 150 has 150 and is produced in China. The KX 350’s needles are 7mm apart where the LK 150’s are 6.5mm. The KX 350 cannot “officially” plate yarn, but there is a trick to make it work, where the LK 150 has a yarn plating function built into the carriage. Both machines are manual where the user selects all needles, and both machines can use most hand knitting yarns.


a LOT of knitting machines and my little helper, Pete

I recently purchased a lot of Brother and Studio machines from an estate sale. Luckily for me, their former owner was a knitting machine dealer and used and maintained her machines well. They’ve been sitting for a couple years, but the buildup on the machines is much less than what I’ve found on other vintage machines that sat for over a decade before I cleaned them.

Other than the accessories and pieces being stored by type (tension units with tension units, cast on combs with cast on combs), the recent machine lot is in good shape.

This makes the restoration process for the majority of these machines more of a simple cleaning rather than replacing and repairing parts like my on-hold Brother KH 260 restoration with a broken patterning unit. That one has to wait until I can procure parts, which is one of the downfalls of working with out of production machines versus current models.


The Cleaning Process


Inventory the Machine

Before I started cleaning, I downloaded the KX 350’s manual from Machine Knitting Etc. I checked parts and accessories against the manual so I could order any missing items as soon as possible.

The accessories for my newly-acquired machines are scattered throughout machine cases and random boxes, but this KX 350 was only missing a 1×2 transfer tool. That’s not too bad, and it could still pop up somewhere.


Cleaning Supplies

  • LPS 1
  • LPS Food Grade H1
  • Dawn dish soap
  • Lukewarm water
  • Toothbrush
  • Clean paintbrush
  • Old towels
  • Blue paper towels
  • Mineral Spirits
  • Glass jar with lid
  • Sponge with Brillo pad side
  • Washi tape

Cleaning the Needle Bed

I started by removing the needles from the needle bed and storing them in my glass jar.

I attempted to pull the old sponge strip out of the machine in one piece, but it had other ideas.

quite dead sponge strip bits

The old sponge strip had no memory or spring left to it, and the places where the needles rested were clearly visible.

nicely dusted but still a bit dirty needle-free KX 350 needle bed

Once the needles were out of the way, I used my clean paint brush to brush away as much dust and dirt as possible. I was surprised at just how much cleaner the machine was with just a little bit of dusting.

I used a paintbrush because the bristles were long enough to reach into the needle slots where the toothbrush couldn’t. As long as your brush doesn’t shed bristles, you should be fine. You don’t want to have to fish out bristles in addition to the rest of your cleaning.


I filled a bowl with tepid water and a little bit of Dawn dish soap. I used a lightly wetted toothbrush to scrub away the dirt and grime.

Emphasis on the lightly.

The bottom of the needle bet still hosts metal parts, so I was careful not to over-wet the toothbrush and slop water everywhere. I worked in small areas and wiped things dry as I went. I did scrub the metal sections, but I was very careful to thoroughly dry them.

I could have removed the metal support sections and cleaned them separately, but they were not dirty enough to warrant it in my opinion. There was no rust to remove.

bottom view of the KX 350’s needle bed with metal support parts and spring-loaded clamp holder

If you are cleaning a KX 350 and decide to remove the metal support pieces, I recommend taking pictures of each support piece and its screws individually before and after removal and keeping them in labeled bags to ensure you don’t lose screws and parts. You’re always better off safe than sorry when working with vintage machines since parts have iffy availability.


For any remaining grime in the needle slots, I sprayed a tiny bit of LPS 1 and scrubbed it with the toothbrush. According to Ask Jack at The Answer Lady, LPS 1 is safe on plastic bed machines as well as metal machines, but I think it’s best to attempt soap and water first.

needle bed before / after

After I finished the needle bed, I took my toothbrush and soapy water to the carriage and wiped the metal carriage plates and accessories with an LPS 1 wipe. (I ordered my LPS 1 wipes from EMI Supply.)

I placed a strip of washi tape on each accessory and put a matching strip on the needle bed. I have quite a few machines, especially mid-gauge and bulky, with accessories that all look about the same at a glance, so I make sure to give each machine its own washi tape code.


Replacing the Sponge Strip

You should always replace the sponge strip in a new-to-you machine unless the seller explicitly states they have installed a new sponge strip and you have checked that it is new. Trust but verify!

The sponge strip/sponge bar is vital to your machine knitting fabric properly.

All that said, replacing the sponge strip in a plastic hobby machine is for. the. birds. This vital process is tedious at best. Give me a metal machine’s sponge bar any day!

The KX 350 has the added insult of these bars across the sponge strip channel.

Don’t worry, I cleaned the grimy bits out of the sponge strip channel!

I used a transfer tool to help scrunch and inch the sponge strip through the channel and under the bars, but any narrow, blunt-tipped object would probably work. I tried to pull the strip with tweezers initially, but it tore the end of the strip and began to tear at the part under the channel bar. I don’t recommend pulling the sponge strip through.

Sponge strips are longer than the needle bed, so I simply snipped off the ugly end, but it would have been fine to leave it as the ends are not actively supporting any needles during knitting.

freshly inserted sponge strip

Needle Cleaning

Upon closer inspection, quite a few needles from this machine had rust on them. A few latches were rusted in the open position, but the majority of rust was in small patches along the length of the needle between latch and butt and would not affect their functionality in knitting. It seems like these needles had some sort of metal plating on them that had just worn off.

While I worked on cleaning the needle bed, I let the needles soak in some mineral spirits in a sealed glass jar.

bits started to come off the needles as soon as I filled the jar

After I finished the needle bed and carriage, I sat outside on my porch and wiped down each needle with blue towel and checked the latch function. It was another task on the tedious end of machine cleaning, but it’s worth it to do it all at once rather than pulling supplies out again mid-test knitting.

I used the toothbrush and a sponge Brillo pad to remove rusty spots, but I think steel wool might have worked better in hindsight.

A couple needles had rough formerly-rusted parts on the actual hook of the latch that could catch on yarn, so I soaked them again overnight and scrubbed them as best as I could before returning them to the needle bed.

I sprayed the needle bed slots with H1 Food Grade lubricant and made sure to wipe off any excess from the top of the bed before reinstalling the needles. I gave the carriage a spray of H1 as well to prepare it for knitting.


Brother KX 350, cleaned and assembled, mid test knit

Test Knitting

With the bed freshly cleaned and assembled, I started test knitting. I used leftover Piropo, a vintage acrylic Millor yarn.

When testing a machine, I believe you should knit using every single function the machine has available. If your machine has a punch card, you should test the punch card functions. If you have a lace carriage, you should test the lace carriage.

For the KX 350, testing means knitting stitches that use the part and hold levers on the side of the carriage for tuck and skip stitches along with some fair isle colorwork. Testing at different tensions is important, too.


Final Thoughts

I bought this lot of machines intending to clean, refurbish, and resell most of them, but working with this KX 350 has me really tempted to keep it. This sturdy little manual machine has a lot of knitting left in it.

Cleaning was a series of simple, sometimes tedious tasks that ultimately added up to about a day or long afternoon of work if you don’t count the downtime of soaking needles.

Since I’m pretty sure the missing transfer tool is floating around my machine shelf, the only part replacement I needed to complete was changing the sponge strip. And replacing a sponge strip/bar is a part of regular knitting machine maintenance, so I feel like that barely counts.

I hope reading through my cleaning process helped you whether you are looking to revive a used machine or simply storing up tips for the future.

If you’re interested in what working on a metal bed machine looks like, check out this post on a Brother KH 260 restoration in process.

Keep an eye here on the site in the future for the Store tab featuring cleaned, refurbished, and TESTED vintage machines in addition to patterns, finished garments, and machine accessories.

Thanks for coming along this knitting journey with me!

yarn review

Yarn Review: Lion Brand Touch of Yak

I bought this yarn in 2020 to review, and, well, 2020 (and now most of 2021) happened. Now it’s on clearance, but if this yarn seems like it’s for you, you might find a good deal on

Lion Brand Touch of Yak

Touch of Yak in Water Lily

All opinions are honest and my own. I am not affiliated with any company or individual mentioned or linked unless otherwise noted. I purchased this yarn myself and did not receive compensation for this review.


About

Fiber Content90-% Acrylic / 10 % Yak
Yardage/Meterage219 / 200
Ounces / Grams3.5 / 100
Yarn Weight4 / Medium / Worsted
Made inChina
AvailabilityLocal Yarn Store, Online
Put upSkein

This yarn is on clearance for $6.99 at the time of this post, so if it’s something you’re interested in, grab it while you can. The clearance price brings the price per yard down from $0.06 per yard to $0.03 per yard.

Originally retailing for 13.99, Touch of Yak is part of Lion Brand’s “Touch of Luxe” collection. The listing mentions “Yak fiber is as soft and warm as cashmere, with wonderful drape,” but with 90% of this yarn being acrylic, any drape you achieve will be from steam blocking or “killing” the acrylic.

Colors are soft, muted, and generally neutral. Now that it’s on clearance, three colorways remain.


Care Guide

Hand WashYes
Machine WashYes
Flat DryYes
Machine DryNo

I machine washed and dried this yarn with no problems. To be honest, I couldn’t tell any difference made by the minimal presence of yak fibers compared to any other decent machine washable and dry-able acrylic.


Knitting Machine Compatibility

4.5mm Standard GaugeNo
6.5mm Mid-GaugeYes
8mm / 9mm Bulky GaugeYes

This is a worsted weight yarn. I wouldn’t put it through any standard gauge machine, but it worked fine on other gauges.


Touch of Yak in Waterlily in a warm light
Pattern: Mirror Cable Mitts on ravelry

Performance

This yarn knitted up fine. It wasn’t anything special, but it wasn’t terrible to work with. When I transferred stitches to form cables, the yarn was annoyingly splitty, but plain knitting was fine. The stitch definition was fine for cables and the finished project looked nice.

There’s really nothing to point out if you treat this like any decent acrylic. The yak is nowhere to be found, especially if you’ve worked with 100% yak fiber before. If you haven’t, you might be able to convince yourself this yarn is softer than another mid-range acrylic, but really, it’s not anything special. There is a slight halo of potential yak fiber if you squint. Maybe?


Blocking

This yarn is 90% acrylic, so block it as such. Too much heat will “kill” the acrylic and freeze it in place. “Killing” acrylic is literally melting the plastic it is made of. You’ll achieve a great drape with this but lose any other properties acrylic might offer.

Careful steam blocking is my blocking method of choice for all yarns, even acrylics, but you should make sure you do not leave your steamer in one location for too long.


Touch of Yak in Water Lily wound into a cake

Final Thoughts

This yarn is fine. That’s it. It’s fine. The “touch” of yak is barely noticeable. It feels like almost any other mid-range acrylic. It’s soft, it works, it’s machine washable, and even though it says not to, it really is machine dry-able. The color range is limited, and the yarn is now on clearance. If you like a slightly softer than normal acrylic and you snatch it up, this could be a good yarn for you provided you aren’t picky about colors. Just don’t expect anything that actually touched a yak when you purchase this.

I give Lion Brand LB Collection Touch of Yak a 2 out of 5 score.


Have you used Lion Brand Touch of Yak before in your machine knitting? What about in your hand knitting? What kind of projects did you use it for, and what did you think of its performance?

Are there other properties you think I should include in my yarn reviews? What yarn should I review next? Let me know in the comments!


News

State of the Ewe-nion 2021

Hmmm… I hate myself a teeny bit for that pun.

There are quite a lot of new and exciting things in the future for ELY Knits, so today’s post is going to be different than the usual review or tutorial. Announcements, new policies, and fun fiber collaborations–all that news is right here!


Patterns and Pricing

Going forward, ELY Knits will still have free patterns, so don’t worry! Free patterns will usually feature both hand knitting and machine knitting versions, but expect there to be some time between the releases of each version.

Patterns from my old blog, Emily Does Everything will remain free but change format from blog posts to free PDF Ravelry Downloads.

New, paid versions of old patterns will be released featuring different sizes and more instructional content. If you want to figure out the sizing yourself, download the free version. If you’d rather have me do it for you, that’s what the paid version is for!

The end goal is monthly patterns, but I’m staying flexible on that one because so much is happening at once!


Ko-Fi Support

Like Patreon, Ko-Fi offers readers a chance to “buy me a coffee” as thanks for the content I produce, but Ko-Fi doesn’t take a percentage of any of the funds.

If you’d like to support the website, yarn reviews, pattern development, tutorials, and more, you can check out my Ko-Fi page at Ko-fi.com/elyknits.

Like Patreon, Ko-Fi now offers memberships. I haven’t enabled memberships yet, but if you’re interested, let me know! Members would receive perks like early pattern access, free copies of paid patterns, knitting help, and the ability to submit options and vote for the next yarn review choice.


Advertisements

In order to help support the site, I’ve enabled advertisements. Advertisements are not chosen by me. They are selected by an algorithm based on your browsing. If you encounter an inappropriate ad, please report it.


This one’s a big one!

Lessons

I’ll be working at a local yarn store again! I worked at my (now closed) LYS for five years before the pandemic.

I have desperately missed being in fiber fellowship with yarn lovers.

This November, I’ll be joining Get Stitchin’ in Tulsa, Oklahoma to offer intermediate and advanced hand knitting classes along with machine knitting lessons.


Knitting Machine Sales

That’s right! Machine knitting lessons mean Knitting Machines FOR SALE! Partnering with Get Stitchin’, we are offering new Silver Reed Knitting Machines for sale.

The LK-150 Knitting machine is a plastic bed mid-gauge machine with nearly limitless capabilities. Different stitches are created by manually selecting needles and changing simple carriage settings. As my mentor Pamela Carrico says, YOU are the brain with this machine.

Most of the yarn reviews, patterns, and projects featured here on ELY Knits use the LK-150 mid-gauge 6.5mm machine.

This is the machine most suitable to the majority of hand knitting yarns and is a great place to start for beginners.

Classes will be based around projects on the LK-150.

For those who want to learn more before purchasing a machine, we’ll have demo days along with a lecture-style class to teach you all about what you can do with the LK-150 and other machines.

We’ll have metal bed machines available for order, too, along with…

Design-A-Knit 9!

The DAK9 software offers nearly endless knitwear design opportunities and directly connects to electronic knitting machines via the Silver Link 5 Cable.

It’s not just for machine knitters, though. Even without a machine and the cable, you can design your dream sweater and more using this extensive software.

Keep your eyes peeled for future announcements here and @ely.knits on Instagram for news on Knitting Machine and Design-A-Knit 9 demonstration days at Get Stitchin’ in Tulsa.


Online Sales

The ELY Knits online store will be launching soon along with the re-opening of my KnitPurlEverything Etsy shop as ELY Knits.

The Etsy shop will focus on ready-to-ship knits where the ELY Knits store (the SHOP tab at the top, coming soon) will offer customization options.


Now for a bit about what we’ll be doing with online sales.

Shipping Materials

We reduce, reuse, and recycle in my house. It’s not just a smart and frugal business and personal choice. I believe it’s better stewardship of our environment to use and reuse where we can.

Purchases from ELY Knits may arrive in many different types of boxes with different types of packing. As we use up the last of our plastic mailers, we will transition to 100% compostable or recyclable materials.

Knits do need protection from wet weather, so some will still ship in plastic. However, this plastic will be reused shipping materials or recyclable materials made from recycled plastics.


Now for the yarn! You didn’t think you’d get through an ELY Knits post without talking about yarn, did you?

Yarn Composition

I like to think of myself as a bit of a recovered yarn snob. I don’t mind acrylic or synthetic fibers. I think those yarns definitely have their place and uses, and quite a few of my go-to yarns are natural and synthetic blends. I’ve even reviewed a few of them here on the site.

But. I think natural fibers are superior options, especially since I want to support my local fiber community as much as possible. And there are fiber farms in Oklahoma, y’all!

I do have synthetic and semi-synthetic yarns in my inventory currently. These will be used completely and then replaced with a natural alternative.

There are some semi-synthetic fibers like Tencel that recycle over 90% of the chemicals used in the extraction process that will likely stay in my stash.

Old yarn stock and recycled synthetic yarns will also stick around. I do my best to reduce yarn waste wherever possible. If I find old stock yarns, even if they’re synthetic, you can bet I’ll bring them in and use them appropriately.


And last but not least,

Collaborations

If everything else I listed out wasn’t enough, EVEN MORE good things are coming! I’m collaborating with local indie dyers and fiber artists to bring some really cool kits and patterns to you in the future.

Covid delays are the norm these days, so I don’t have a specific timeline for some of these projects yet, but rest assured they will be amazing!

Oh, and Yarn Dyeing friends? Hand Knitting Design friends? If you’d like to collaborate on a hand and/or machine knitting project, hit me up!

Whether you’re looking for a pattern to highlight your yarns or you’d like to make your hand knitting pattern more accessible to machine knitters, I have you covered!

I am always up for working together with my fiber friends.


Thanks for wading through all of that! I wasn’t sure when or how to announce some of these things in posts with more concise topics, so I appreciate you sticking around to the end and reading all of the wonderful things coming your way via ELY Knits.

As always, let me know what you think in the comments below!

What ways do you reduce, reuse, and recycle in your fiber life?